How to Compress a Video on MacBook
Updated on January 19, 2026

If you frequently work with video files, you are aware of how massive and resource-intensive they can be. When it comes to video editing, compressing is one of the most handy features a piece of editing software can employ.
Mac users have a few different alternatives for compressing a video file, which involves reducing the video file size. Although Macs have built-in video compressors and software that is included by default with the operating system, using an online video compressor or other software may be a better option if you want to compress video.
If you are looking for methods to compress a video on Mac, this article will help you understand which tool might make your video resizing process smoother.
What Is Video Compression and How Does It Work?

Video compression involves encoding a video file so that it takes up less space than the original file and is easier to send over a network or the Internet.
By removing extraneous and useless material from the original video file, it is a type of compression technology that reduces the size of video file formats. For instance, a video may repeatedly play the same background, image, or sound, or the data displayed or attached to the video clip may not be very relevant. To make the video file smaller, video compression will remove all of this information.
A video's original format is altered after compression into a different format (depending on the codec used). To play the video file, the video player must either support that video format or be integrated with the compression codec.
By grouping similar pixels together in huge blocks, video compression software analyzes the pixels in each frame of the video and compresses them. This explains why a video's inadequate compression might result in blocky, low-detail visuals.
Why Do You Need to Compress Videos?
Video compression might not seem ideal at first because it technically lowers the video quality, even though it might not be that noticeable.
While there are tools you might use that will result in visible quality loss, however, there are actually a number of compelling advantages and justifications for compressing video files:
Lack of Device Storage
The amount of storage space required for storing the video data is decreased by file compression.
If your device is limited in space, a video compressor can be extremely helpful. A 64 GB SD card, for instance, can store up to 5 hours of 4K UHD footage when it is compressed using HEVC, yet less than 2 minutes of uncompressed raw footage will completely fill it up.
While deleting the video is a temporary fix, utilizing video compression to shrink the video can permanently cure the issue and free up space to keep new films.
Simpler and More Practical Data Transfers
Videos that have been compressed into smaller files are simpler to transfer. Not only does it take less time, but if you're trying to transfer the file over the internet, it also uses less bandwidth.
Additionally, you will have more options for transferring smaller files and won't run into as many problems with file size restrictions. This is extremely useful for those working with lengthy video materials on a daily basis.
Faster File Reading and Writing
When you compress video files, the videos are smaller and use less bandwidth, so video hosting platforms can process them quickly and effectively (i.e., convenient uploads plus faster and smoother transmissions). This stops the video from crashing or taking a very long time to play.
As a result, even people with slow internet connections may watch videos with excellent quality.
How to Compress a Video on MacBook: 2 Methods to Try

If you are a MacBook-user, you already know that compressed files are the way to go for saving up as much space as possible and making sure that the computer is running all the programs
What is the best way to compress a video file on MacBook? We will explore two of the best free video compression options available:
Compress videos with a built-in Free Video Editor (iMovie)
Given that it will already be installed by default on your Mac's operating system, iMovie may be the first option for anyone wishing to reduce the size of a video on a Mac. The program is a video editor as well as a converter, and it offers a wide range of settings so that anyone may use it to compress video.
One of the best features of utilizing the iMovie app is that no other software needs to be installed. It's already installed on your computer, and on a Mac, it might even be the default way to compress videos.
Here is the step-by-step process to compress a video on Mac with iMovie:
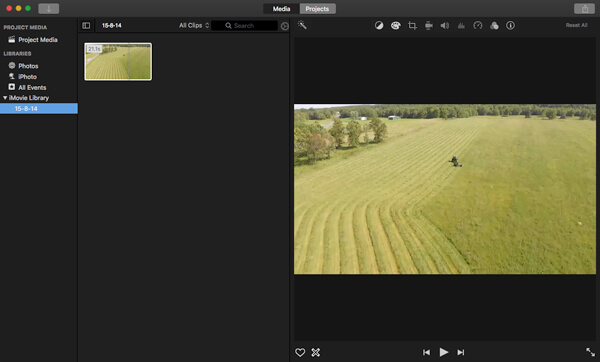
Load and Edit the Video
Import the video of your choice, and if you feel the need of doing so, select whether to edit it or not. For example, you might decide to top and tail the video to diminish its size and save space.
Important note: According to the official statement, iMovie is compatible with DV, MPEG-4, MPEG-2, MOV, and M4V file types. You should convert the imported files to an iMovie format if they are not on the list.
Compress the Video
When you have chosen the video in iMovie, go to "File" and select the "Share" button from the toolbar. The video can be compressed for email, iTunes, YouTube, Facebook, Vimeo, and other platforms. To adjust the various settings for the lengthy video, select "File."
Edit the Parameters
The video file format you have uploaded can have its file size reduced by adjusting the Resolution and Quality settings. Before you export, the software will estimate the size of the video file for you.
Various video settings are available, including description, tag, format, resolution, quality, and compress. To reduce and minimize the enormous material to one lower in size, you can adjust the resolution to 540P, choose the video quality, and use the compress method.
Save the Video File
Of course, you can cut out the unnecessary parts or lessen the length of the video. For another option, select "Window" > "Show Clip Trimmer" to eliminate the video frame. When you are happy with the outcome, select "Next" to export the compressed video to iMovie.
You can move the file to any location you like after finding it on your desktop, for example, cloud storage or an external hard disk.
Even if you use the aforementioned method to compress the huge video in iMovie, the final product can still be blurry. Why? Even if you don't manually activate any video codec conversion, iMovie will use Apple Intermediate Codec to compress the imported video file into a QuickTime format. You should only have a few options for "Format," "Resolution," "Quality," and "Compress" because of the output parameters' restrictions.
Compress files with a Free Online Video Compressor (Flixier)
If you are looking for an easy-to-use and time-efficient method of video compression, you might want to try an online video compressor. As they work on a cloud-based platform, they significantly reduce the time for compressing videos on Mac. Such an example is Flixier, our online video editor with an intuitive interface.
Here is the step-by-step process to compress videos on your MacBook with the help of Flixier:
Upload
Open the Flixier video compressor up in a new tab. Drag and drop the video you want to compress over to the Video Compressor window.

Compress
Choose a compression level simply with the slider, or fiddle with more complex options like resolution, bitrate, frame rate, and CRF.

Download
When the video file has finished being compressed, you can download it to your device and share it wherever you like!

In three easy steps, the video can end up on your social media accounts or Google Drive. Flixier is a free video compressor targeting those who need a quick solution for lowering the file size.
Flixier vs iMovie: What to Choose?
You don’t know what to choose when it comes to Flixier vs iMovie? It depends on the features you are looking for in the best video compressor for Mac.
iMovie seems to be a simpler solution at a first glance as it is already installed on your MacBook. Yet, it isn't the quickest method for Mac users to compress video, the conversion process can be quite lengthy. Additionally, if you are unfamiliar with video editing, the UI may seem intimidating.
Using Flixier is a smooth experience on any computer, be it a Macbook, a Chromebook, or a Windows laptop because it employs cloud computing and runs in your web browser. With Flixier, you can edit your videos without being restricted to a single platform and without having to invest money on a new computer. As a content creator, we think it's ideal to focus your energy on creating content rather than worrying about device compatibility and upgrades.
Moreover, Flixier can help you collaborate in real-time and publish your compressed video in under 3 minutes. The online video compressor does all tasks in the cloud, in contrast to other programs that may need a strong machine to handle video compression. This implies that all of the labor-intensive work is completed on our servers, freeing up your machine from unnecessary stress. You can learn more about the features we offer by checking out the Flixier YouTube channel.
Compress Your Video Files with the Help of Flixier!

The video editing software you end up choosing for compressing your videos can make or break the overall experience of compressing videos on Mac. This is why you need to make sure that all variables are taken into account: file size, video quality, time efficiency, user experience, etc.
Why should you use Flixier then? Because:
It's easy to use
Flixier was designed to be as simple to use and understand as possible. You can get the job done with our video compressor without wasting time on YouTube instructions.
It is superfast
Our video editor is cloud-based. That implies that our servers are doing all of the labor-intensive work. By doing this, we can always compress your videos so that they are ready in three minutes or less.
High video quality, low video size
Our video compression technology was meticulously planned and refined to reduce file size without degrading your video's visual or audio quality.
You can use it on multiple devices
Flixier is cloud-based, so you may use it to compress videos on any computer, regardless of the manufacturer.
In short, with Flixier, a feature-rich, user-friendly, and entirely cloud-powered platform, you can compress your videos in a matter of minutes. If you aren't convinced yet, try our free tool and make the most out of our video compression and other editing features!
Andra is highly curious about the marketing field, but most of her experience lays in the content writing sphere, mainly in relation to social media marketing, social media automation, and video marketing.