How to Make Your Voice Recordings Sound Professional Using Audacity
Updated on July 21, 2025
In last week’s blog post we gave you some tips to help you get higher quality vocal recordings.
That advice was meant to be put into use during the preparation phase, long before you press the record button.
This week’s article is all about post-production, meaning the things that you can do to enhance your audio after it’s already been recorded.
More specifically, we’re going to teach you how to use Audacity - a professional audio editing tool - in order to clean up your recordings and create professional sounding voice overs for your videos.
Since a good setup is going to make post-production a lot easier, we highly recommend that you follow the steps in the previous article first in order to get the best results.
Choosing the Audio Recording Software
If you’re a Flixier user, you probably know that you can record audio straight into our video editor using your computer’s microphone. In fact, thanks to our new AI audio enhancer feature, you can even remove background noise from your recording or enhance speech clarity with just a few clicks. All you have to do is upload your audio, then choose the type of media you're working on, and pick the type of enhancements you want to apply.
This method works perfectly fine for most people, and it can save you a lot of time if you're looking for a quick and easy way to improve a voiceover and clean up the audio for your online content.
If you want to get more in-depth with your post-production, however, you’re going to have to use professional audio-editing software.
There are plenty of software solutions to choose from, but for the sake of accessibility and simplicity, this tutorial is going to be about Audacity since the software is free, open source, and multi-platform.
Most importantly, however, Audacity is incredibly powerful. Under the bare-bones interface lies an absolute beast of a program that will serve you well even if you decide to delve deep into the study of audio production.
Installing Audacity
To install Audacity, simply follow this link to the official website and download the appropriate version depending on your Operating System.
Setting up Audacity for your first time
If this is your first time starting up Audacity, the wealth of options and unlabeled buttons just waiting to be clicked can be a little overwhelming.
We know it looks a little intimidating, but don’t worry: you won’t ever have to interact with or understand 90% of those options in order to follow our tutorial.
In fact, let’s take a quick tour of the interface and show you the things you need to do before you start recording:

The first thing you need to do is take a look at these two drop-down lists. They allow you to select your recording and playback devices.
Make sure your microphone shows up as a recording device and that your headphones/speakers (depending on what you use) are selected as the playback device.
This way you’ll be able to record your voice and listen back to your audio during editing.
Next up are the recording and playback controls:
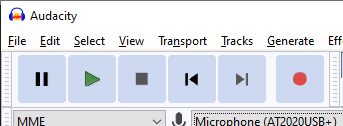
These will look familiar to anyone who has ever used a music player before.
The red button makes Audacity start recording, while the gray square stops it.
You use the play and pause buttons to control the playback when you’re reviewing your audio tracks, just like you would do with the video preview in Flixier!
These two sliders control the gain (microphone icon) and playback volume (speakers icon) respectively:

If you read our previous piece, you already know that setting your microphone gain properly is an essential part of recording.
If your microphone doesn’t have a physical gain dial, then you can modify it using the slider here in Audacity.
At the top is a list of drop-down menus.

The File menu is where you go to save your projects and import and export audio files.
Take a good look at the Effect menu, because that’s where we’re going to be spending all of our time when editing our voice over.
Now that you’ve become acquainted with the basic elements of Audacity’s interface, it’s time to get to work!
Recording and enhancing your audio with Audacity:
1. Record your audio into Audacity
The first step is pretty straightforward.
Just hit the red button to start recording your voice over!
Before you start talking, however, let the microphone record a few seconds of “silence”. This is also known as “room tone” and it will come in handy later when we use Noise Reduction to get rid of all the background noise.
You’ll also notice that a timeline appears on your screen, displaying the waveform of your audio and updating in real time as you speak.
2. Apply Noise Reduction
Now that you’ve finished recording your voice over, your timeline should look something like this:
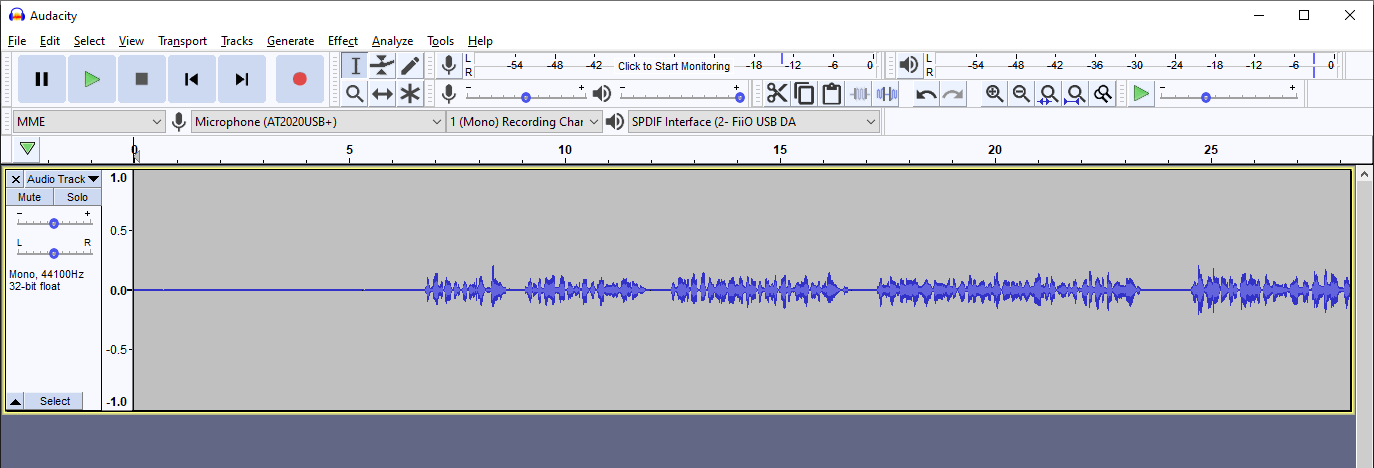
You can zoom the in and out on the Timeline by holding down the Control key and using your mouse wheel.
Similarly, you can select things on the timeline by clicking and dragging with your left mouse button.

If you listen back to your recording, you’ll probably notice some background noise. We’re going to use Audacity to remove it. Here’s how:
1. Select the “quiet” segment at the start of the track. The one that’s all background noise, with no talking.

2. Then, go to the Effect menu at the top and select Noise Reduction.
A window will pop up with a couple sliders. In the screenshot below, you can see the settings that I’m using, but the default ones will do just fine.
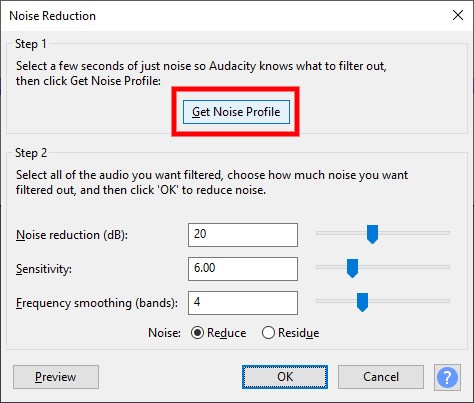
3. Before it can apply the Noise Reduction, Audacity needs to know what the “noise” itself sounds like. This is why we selected the background noise portion of your audio. Click on Get Noise Profile.
4. Now that Audacity has the noise profile, select all of your audio using Ctrl + A and then go back to the Effect menu and select Repeat Noise Reduction. Alternatively, pressing Ctrl + R repeats the last effect automatically.
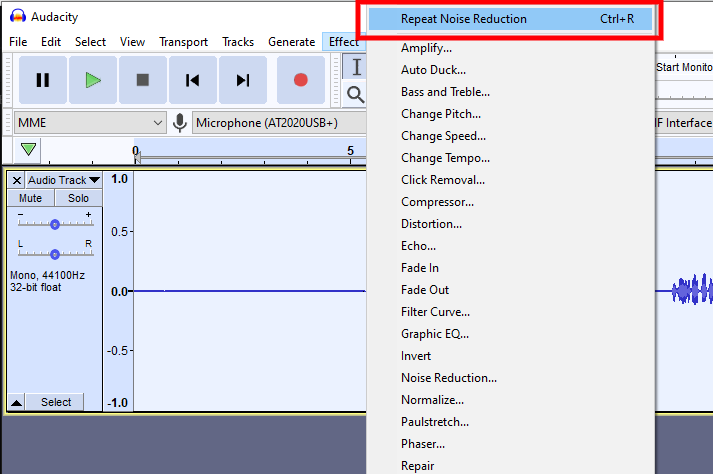
That’s it! All of the background noise should now be removed.
If there’s still noise, you can try applying the filter again, but watch out: using the noise reduction effect too many times will reduce your audio quality and make your voice sound tinny and robotic, so use your own discretion.
3. Normalize to 0 dB
In our previous guide, we mentioned that you should set your gain lower than 100% in order to prevent clipping.
If you followed our advice, you will notice that your newly recorded track is a little quiet. This next step will fix that.
1. Select your entire track again using Ctrl + A.
2. Go back to the Effect menu and click on Normalize.
3. When this menu pops up, copy the settings that you see in the screenshot and click okay.
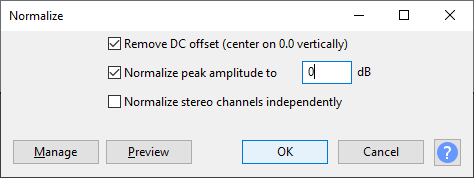
We used the Normalize option to amplify our audio and make it the loudest it can be without distorting it. You likely noticed the soundwave getting a lot thicker on the timeline.

If you’re wearing headphones, you might want to turn the volume down a little before previewing the changes!
4. Compress
Now that your audio is loud enough, it’s time to compress it!
In layman’s terms, the Compressor is going to make the loud parts a little quieter and the quiet parts a little louder.
That might sound stupid, but trust is, it’s going to make everything sound crisp and you’ll be a lot easier to understand.
In order to apply the compression effect, follow the same steps as before: select the entire track with Ctrl + A and then click on Compressor in the Effect menu.
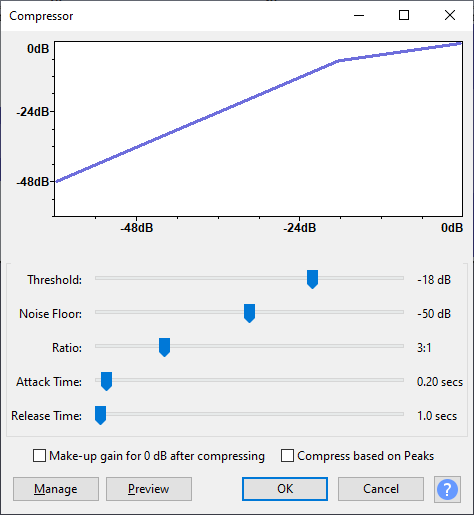
There’s a lot of sliders to play with when it comes to compression.
We recommend that you play it safe and copy the settings you see in the screenshot.
If you feel like your audio sounds a little odd after previewing it, you can lower the ratio from 3:1 to 2:1.
Click OK and listen to your audio again.
It will sound a lot crisper, but you’ll also notice that it went back to being a little quiet.
Don’t worry, we’re going to fix that soon enough!
5. Add some EQ
This next step is going to be very subjective, since it depends a lot on your voice and microphone.
When you listen back to your recording, you may notice that your voice sounds a little off. It might be a little too bassy or (as is often my case) a little too nasal and grating.
Luckily, we can easily fix that by adjusting the low, mid or high end a little in Audacity.
To do this, you need to select the entire track again with Ctrl + A, head to the Effect menu and choose Filter Curve.
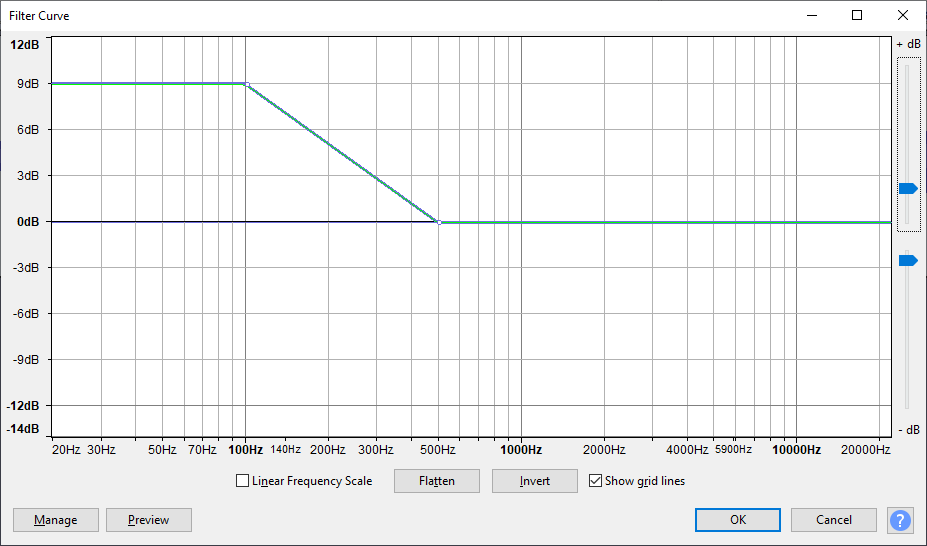
Feel free to play around with the curve here and adjust it to your liking.
You can always press the Preview button in the bottom left to listen to the changes before you apply them.
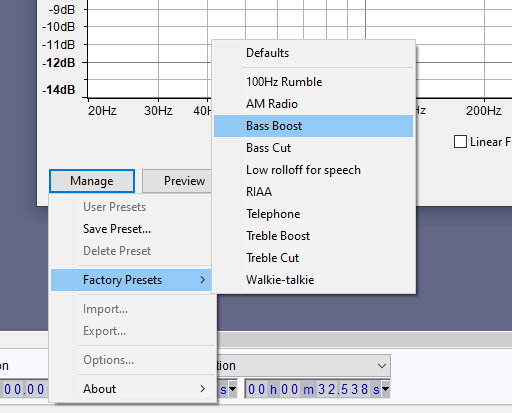
If you’re not sure what you’re doing, you should go to Manage, then Factory Presets, and choose one of the presets there.
When I edit my videos, I like to apply the Bass Boost factory preset, since my voice is a little lacking on the low end.
Once you’ve chosen your equalizer settings, click on OK, and Audacity will apply them to your track!
6. Normalize (again) to -3 dB
The final step in the process is bringing your audio back to a loud enough volume.
We’re going to use Normalize again in order to do that, only this time we’re going to set the peak amplitude to -3.0 dB.
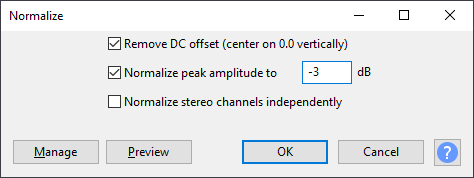
This will result in audio that’s still loud, but give you a little room to play with in case you need to amplify it more in the future.
Using a Noise Gate to remove breathing sounds
If you listen to the final recording again, you might have the displeasure of discovering that despite the noise reduction we applied in the first step, you can still hear yourself breathing loudly between sentences.
Not everyone will have this problem, but if you do run into it, there is a way to fix it!
Installing Nyquist’s Noise Gate plug-in
In order to do that, though, you’ll first need to install a plug-in for Audacity. Don’t worry, we’ll walk you through the process:
- Download the plug-in from this website. You should end up with a file called Noisegate.ny
- Copy the file.
- Navigate to your Audacity install folder, go to Plug-Ins, and paste the Noisegate.ny file into that folder.
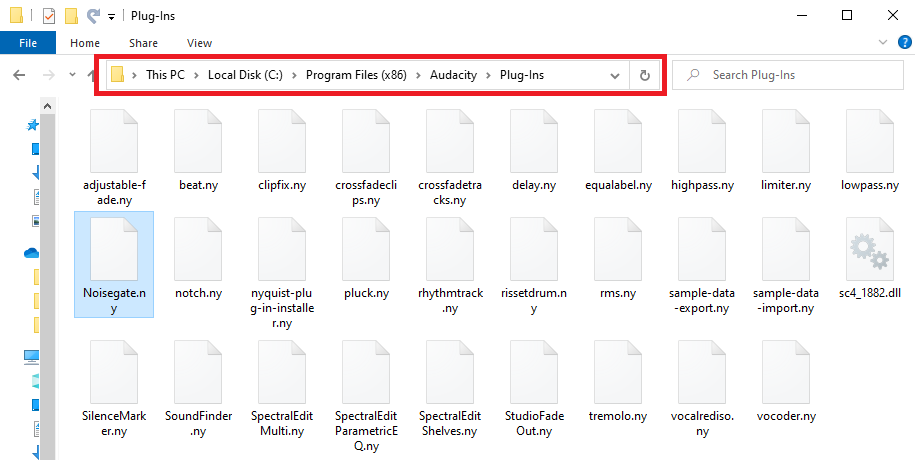
By default, the install path should be C:\Program Files (x86)\Audacity\Plug-Ins (if you’re using Windows)
4. Open up Audacity, go to the Effect tab and click on Add / Remove Plug-Ins
5. Look for the plug-in called Noise Gate. Select it and click on Enable.
Now that the plug-in is installed, let’s get to work on getting rid of the unwanted breathing sounds:
First, click on this little arrow icon on the Timeline. From the drop-down menu, select Waveform (dB).
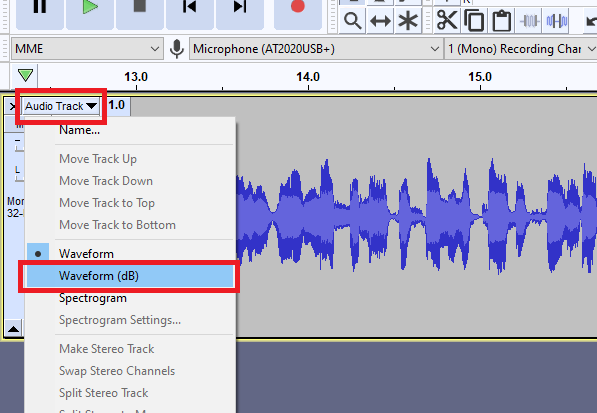
Now zoom in on an audio snippet where there is an audible breath. Check to see what dB levels the breath reaches by looking at the measurements on the left side of the timeline.
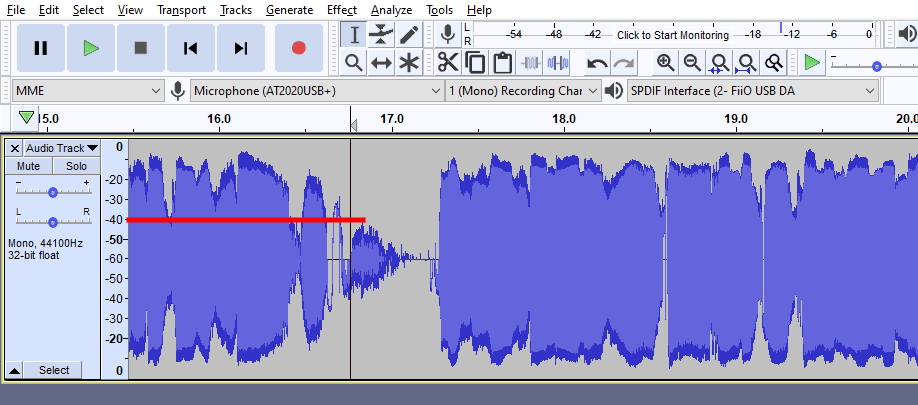
In my example, my breathing reaches around -40 dB.
Now, select your audio track, go to the Effect tab and click on Noise Gate. This menu will pop up:
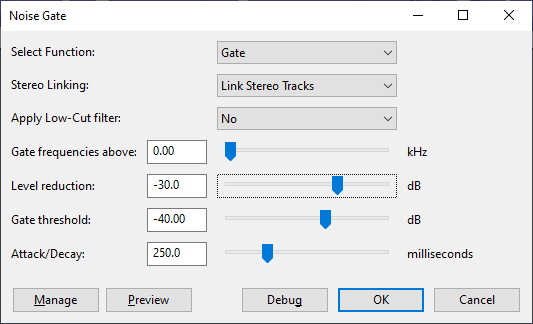
A noise gate analyzes the volume of all of the sounds in your recording. Any sound that doesn’t cross a certain volume threshold (like a loud inhale) gets muted!
In our case, we want to set the Gate Threshold to -40 dB.
Since my voice is significantly louder than -40 dB, the Noise Gate will leave it alone. My breathing sounds however are under -40 dB, so their volume will be reduced.
Use the Level reduction slider to choose how much you want the volume of the breathing to be reduced. You can set it to something like -40 to make it completely quiet, or something like -20 to make it just barely audible (since no breathing sounds at all can sound a little unnatural).
Leave the other settings at their default value.
Click OK and your Noise Gate will be applied, resulting in a crisp voice over that doesn’t have any loud inhale or exhale noises.
NOTE: Try not to set the Gate Threshold to anything above -35, since that might end up muffling some of your speech. Keep in mind that in order for the Noise Gate to be effective, your speaking voice needs to be significantly louder than the breathing noises.
That’s it! Your voice over should now sound significantly better than it did just 5 minutes ago!
You can save your Audacity project by going to the File menu and clicking on Save Project.
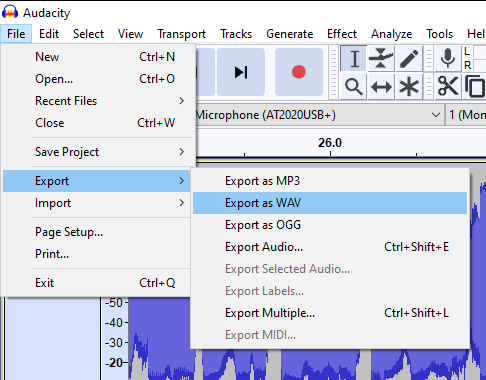
If you want to end up with an actual audio file that you can import into your video editing software, choose the Export option.
I usually choose to export my files in the .WAV format in order to ensure maximum quality.
After your audio file has been successfully exported, you can import it into Flixier and start editing your video!
Closing Words
Thank you for making it this far! We know Audacity isn't the most user-friendly software, but we hope this guide managed to help you navigate it!
Good luck making videos, and make sure to keep an eye on our blog or subscribe to our YouTube channel for more video editing guides!
Dan is passionate about all things tech. He’s always curious about how things work and enjoys writing in-depth guides to help people on their content creation journey.

How to Create Great Instructional Videos in 6 Easy Steps (2021)
Are you looking for a way to leverage your teaching skills and start a successful YouTube channel? Or maybe you’ve worked hard to become an expert in your field and now you want to help others out on their journey. No matter what your reasons for creating instructional videos are, this guide is going to help you navigate through the process step-by-step.
Seven Tips That Will Make Your Microphone Sound Better When Recording
If you’re looking to improve the quality of your voice recordings, you don’t need to worry anymore! We’re here to give you some tips that will help you get better sound for your videos. These tips will work regardless of whether you’re using Flixier to record your voice or other programs like Audacity or Adobe Audition. For the most part, getting a high quality recording relies mostly on preparation, meaning most of the work gets done before you even press the Record button.
How to Effectively Use Audio in Your Video
We all know how important it is to use audio in your video. It helps you convey a much stronger message and it overall improves the quality of your content. In this post, we will go through a few simple ways to use audio more effectively while you edit video.
How to Get Amazing Audio for Your Videos
How to add background music to my video? Where can I get high-quality music for my video? Are there free sites to get audio? To answer them in an effective way we decided to write this blog post and go through top 6 audio sources for your video.


