- Home
- Blog
- Educational Videos
- How to Create Great Instructional Videos in 6 Easy Steps (2021)
How to Create Great Instructional Videos in 6 Easy Steps (2021)
Updated on July 25, 2025
This is article is meant to be a step-by-step that takes you through each of the six steps you need to take in order to create high quality instructional videos that people will love!
Step 1: Find a topic for your instructional video
Are you looking for a way to leverage your teaching skills and start a successful YouTube channel? Or maybe you’ve worked hard to become an expert in your field and now you want to help others out on their journey.
No matter what your reasons for creating instructional videos are, the first step is always the same: planning.
In order to make effective instructional videos, you need to decide:
1. Who your audience is going to be.
2. Find a topic for your video (something that your audience needs help with)
3. The language they use when they talk about it.
1. Find your audience
Before you can start working on any video, no matter if it’s instructional or not, you first need to ask yourself “Who am I making this for?”.
Given the nature of instructional videos, you probably already have a pretty good idea of who your general target audience is. After all, anyone who makes instructional videos does so to share the knowledge they have in a certain field or niche, so naturally your audience is going to be people looking to learn more about that particular topic.
If you don’t have an audience in mind already, then try to think about the things you’re good at. It doesn’t matter if it’s a sport, a very specific software suite or even a school subject like literature or math. All that matters is that you’re able to explain it well and help others gain a better understanding of the subject through video.
After you figured out who your audience is, it’s time to move onto the next step:
2. Figure out what your audience needs help with
Here’s an example: let’s say you’re an experienced video editor looking to share his knowledge and help out anyone new to the field.
Unless you’ve spent a lot of time working closely with beginners, you might find it difficult to relate to their struggles and identify the problems they encounter when learning how to edit their first videos.
And understanding the problems your audience faces when trying to complete a task is exactly what your job is if you want to create instructional videos for them.
So, how do you learn what your target audience is looking for in an instructional video?
Well, there’s a couple of ways to do that! The internet makes it easier than ever to find communities dedicated to whatever your target niche is. You can look for Facebook groups, forums, Quora topics dedicated to it, or even better, for reddit boards (also known as subreddits).

Once you find these places, try to hang out there for a while to see what kind of questions people ask and try to identify the areas where they might need help.
Depending on where these communities are hosted, they might even have daily, weekly or monthly beginner threads where newbies can post questions and ask their more experienced peers for help. You should observe these threads closely and try to see if there are any topics that come up repeatedly. Those are the kind of topics you need to make instructional videos on. We recommend writing these topics down somewhere so that they’re easy to reference later.

If you want to, you can even consider making your own posts offering to help people out and answer their questions, or asking if they would appreciate a video tutorial on the topic. Just make sure to read the rules before posting and make sure you’re providing value for the users!

If you’re just using their platform to gather content or promote your YouTube channel, people will figure it out quickly and they’re not going to like it. These communities are an invaluable resource for you both as a content creator, so make sure that you leave a good impression.
Now that you’ve decided who your audience is going to be and figured out what they need help with, it’s time to pick a topic for your first instructional video.
Go back to your research and look through the things that people needed help with. Choose one of these as the topic for your clip.
REMEMBER: When making instructional videos, it’s important to focus on one thing at a time. Trying to cram multiple things into one video is going to make it harder for your audience to assimilate and remember the things you’re trying to teach them. You should always try to keep your videos short and simple.
3. Take note of the way your audience talks
First off, it’s important to note that when we talk about language in this context, we don’t mean figuring out whether your target audience speaks English or Spanish.
What we mean is figuring out what words they use to describe their problems. That’s mostly because depending on the field that you’re in, professionals can use a lot of jargon (highly specialized words) that the newbies are most likely not familiar with.
If your instructional videos are meant for beginners, then it’s important that you avoid jargon as much as possible and try to explain things using words that they can understand and relate with.
Taking note of the words they use when they describe things will also help you introduce them to the more specialized terminology of your field in a way that makes sense to them.
Let’s go back to our video editing example: if you’re trying to introduce beginners to a new video editing software suite, you probably shouldn’t refer to a ‘playhead’ all the time, at least not before making it clear that it’s ‘the little yellow bar that moves over the timeline when you play the video’.
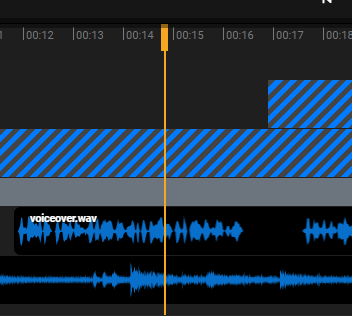
On top of all that, “speaking the same language” as your audience does more than just help with the learning process: it also helps the people in need of your instructional videos discover them more easily.
Using the same words and expressions your audience uses means people are more likely to have your videos recommended to them when looking up their problems on YouTube or Google. It’s basically a form of Search Engine Optimization (most often referred to as SEO) and it will be especially helpful for those of you that are looking to turn their instructional videos into a source of profit. If you want to learn more about video SEO and how it can help you get more views, we highly recommend checking out our two-part guide on the matter.
For those of you still reading at this point, congratulations! You got a solid start on the path to making great instructional videos! Now that you identified your audience, the topics that you need to address in your videos and the way your audience speaks, you have a strong foundation that you can start building on.
So with this information in mind, we can now move on to the next step: writing the script.
Step 2: Writing the script
What are the benefits of writing a script for my instructional videos?
Having a good script to follow is crucial to creating successful instructional videos. Just like a lesson plan, a script helps you stay focused on what really matters and keeps your video flowing along smoothly.
Nobody wants to watch a video tutorial where someone rambles incoherently or jumps from one topic to another constantly. Having a well written script to keep you on the right track can ensure that your instructional videos hit their mark and keep your viewers engaged and learning new things.
Other benefits of having a script are that reading off of it (or having it memorized) will:
1. help you sound more confident
2. prevent you from making too many mistakes in the narration.
That first problem can be huge, especially if you’re new to making videos and find yourself to be a little camera shy. Trying to explain something to the camera like there’s another person in the room with you can feel a little strange at first, and in some people it can even trigger the same feelings of anxiety as speaking in front of a crowd. Reading off of a script, especially if you’re just doing a voice over, feels less like public speaking and will probably help you sound a lot more confident and professional in your clip.
As far as making mistakes goes, having a script is definitely going to increase your productivity by reducing the time you need to spend editing out mistakes in post-production (more on that when we get to recording your voice overs though).
The more important thing to keep in mind here is that a script allows you to easily double-check your information before you start recording your video tutorial. That means that you won’t have to waste time re-recording parts of your voice over and editing it into the final video just because you accidentally misquoted a number or referred to something by the wrong name.
Tips for a good instructional video script
Now that we’ve talked about why having a script for your videos is important, here are some tips to help you write a script that will make your instructional videos successful.
1. Outline the things that you need to talk about
The first step you need to take is writing down all the ideas or points that you want to touch on in your video, in order. If it’s a video tutorial, make sure you write down every step that you’ll go through along with your viewers in order to fix their problem or achieve their goal.
2. Use a conversational tone
After you have the main ideas written down, use a conversational tone to fill in the rest of the script. Write as if you were explaining this to a friend, or in front of an audience. Short, simple sentences and a conversational tone are preferred.
3. Don’t get sidetracked
When trying to explain something to your viewers, it can be tempting to bring up facts that aren’t necessary for completing the task at hand in an attempt to provide as much value and information with your videos as possible.
Trying to cram too much information into a video will make it difficult to follow and you’ll end up confusing your audience rather than educating them. Remember, breaking down information and taking things one step at a time is essential!
Things that seem easy to follow and understand for you as a professional in your field can easily be overwhelming for a newbie who’s just trying to get started. Rather than telling people a little bit about everything, focus on explaining the main topic of the video really well and if you feel like it could be helpful, provide links to sources where people can learn more in the description or at the end of your video.
4. Avoid jargon
We already touched on this in our previous section, but it’s important enough that it’s worth reiterating: try to use language that your viewers can understand. That means avoid jargon and other highly specific, technical terms.
If you feel like your audience will find it helpful, you can even pick certain jargon words that are common in your field and explain them in a way that newbies can understand, to make it easier for them to understand what professionals are talking about in the future.
5. Have some sort of story-board to go along with your script
This last tip isn’t mandatory for a good script, but it can make editing a lot easier when working on more complex projects.
A storyboard is just a visual representation of what you want your video to look like. It means breaking your video down into scenes and making a quick sketch of what you want those scenes to look like. Basically drawing a comic of your video before you start recording it.
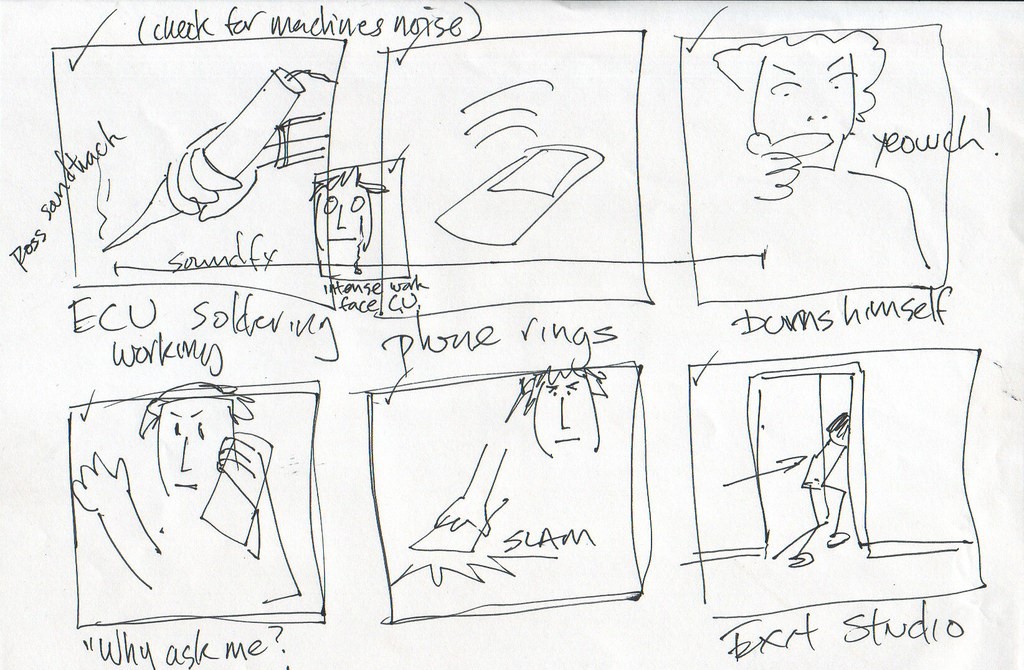
While making a storyboard can take a bit of work, it can save you a lot of time later, especially if your video is more complex, since it lets you plan your shots ahead of time, making filming and recording a lot faster.
If you’re doing a screencast video tutorial where the majority of the video is either stock footage or screen recordings, you don’t need to draw the storyboard. Instead, you can make something more text oriented, that has descriptions instead of pictures.
The left column will contain your voice over script, while the right column describes what you will be showing on screen at any given moment. This way, you know exactly what stock footage to look for and what screen recordings you need to make before you start editing.
6. Read your script out loud
After you’re done working on your script, you should read it out loud at least once after you’re done writing it, as if the mic was on and you were trying to record your voice over.
No matter how good of a writer you are, you’re bound to discover some mistakes or parts that sound odd and unnatural. Correct them and continue tweaking the script until you end up with something that sounds natural when you read it out loud.
Having a script that you’re comfortable reading will make the next step of creating instructional videos a lot easier.
Speaking of which… You’ve planned out your video and written a good, detailed script. Now it’s time to move over to the next step: recording your voice over.
Step 3: How to record a professional voice over
There’s a common saying among content creators that “audio is the most important part of a video”. That’s because it’s very difficult to follow along and focus on an instructional video if you can’t understand what the person is saying.
Sure, some types of instructional video like screencasts and video tutorials make it easier for viewers to understand what’s being presented by offering a lot of visual instructions as well, but you should still do your best to make sure that you have good, clear audio to complement your visuals.
Unfortunately, getting good audio is a lot trickier than your favorite YouTuber or podcaster can make it look. The good thing is though, we’re here to guide you through the entire process!
Do I need a dedicated microphone to make instructional videos?
Obviously, a huge part of getting high-quality audio for your video will depend on your microphone. So whatever you do, do not record the voice over for your screen recording using your laptop’s built in microphone.
Built-in laptop microphones are most often included as an after-thought, and they’ll probably pick up the noise your computer fans make more than your voice.
If you don’t have the money to spend on a dedicated microphone, even the cheapest 10 dollar earbuds can do a better job, not to mention that you most likely already own the pair that came with your mobile phone.
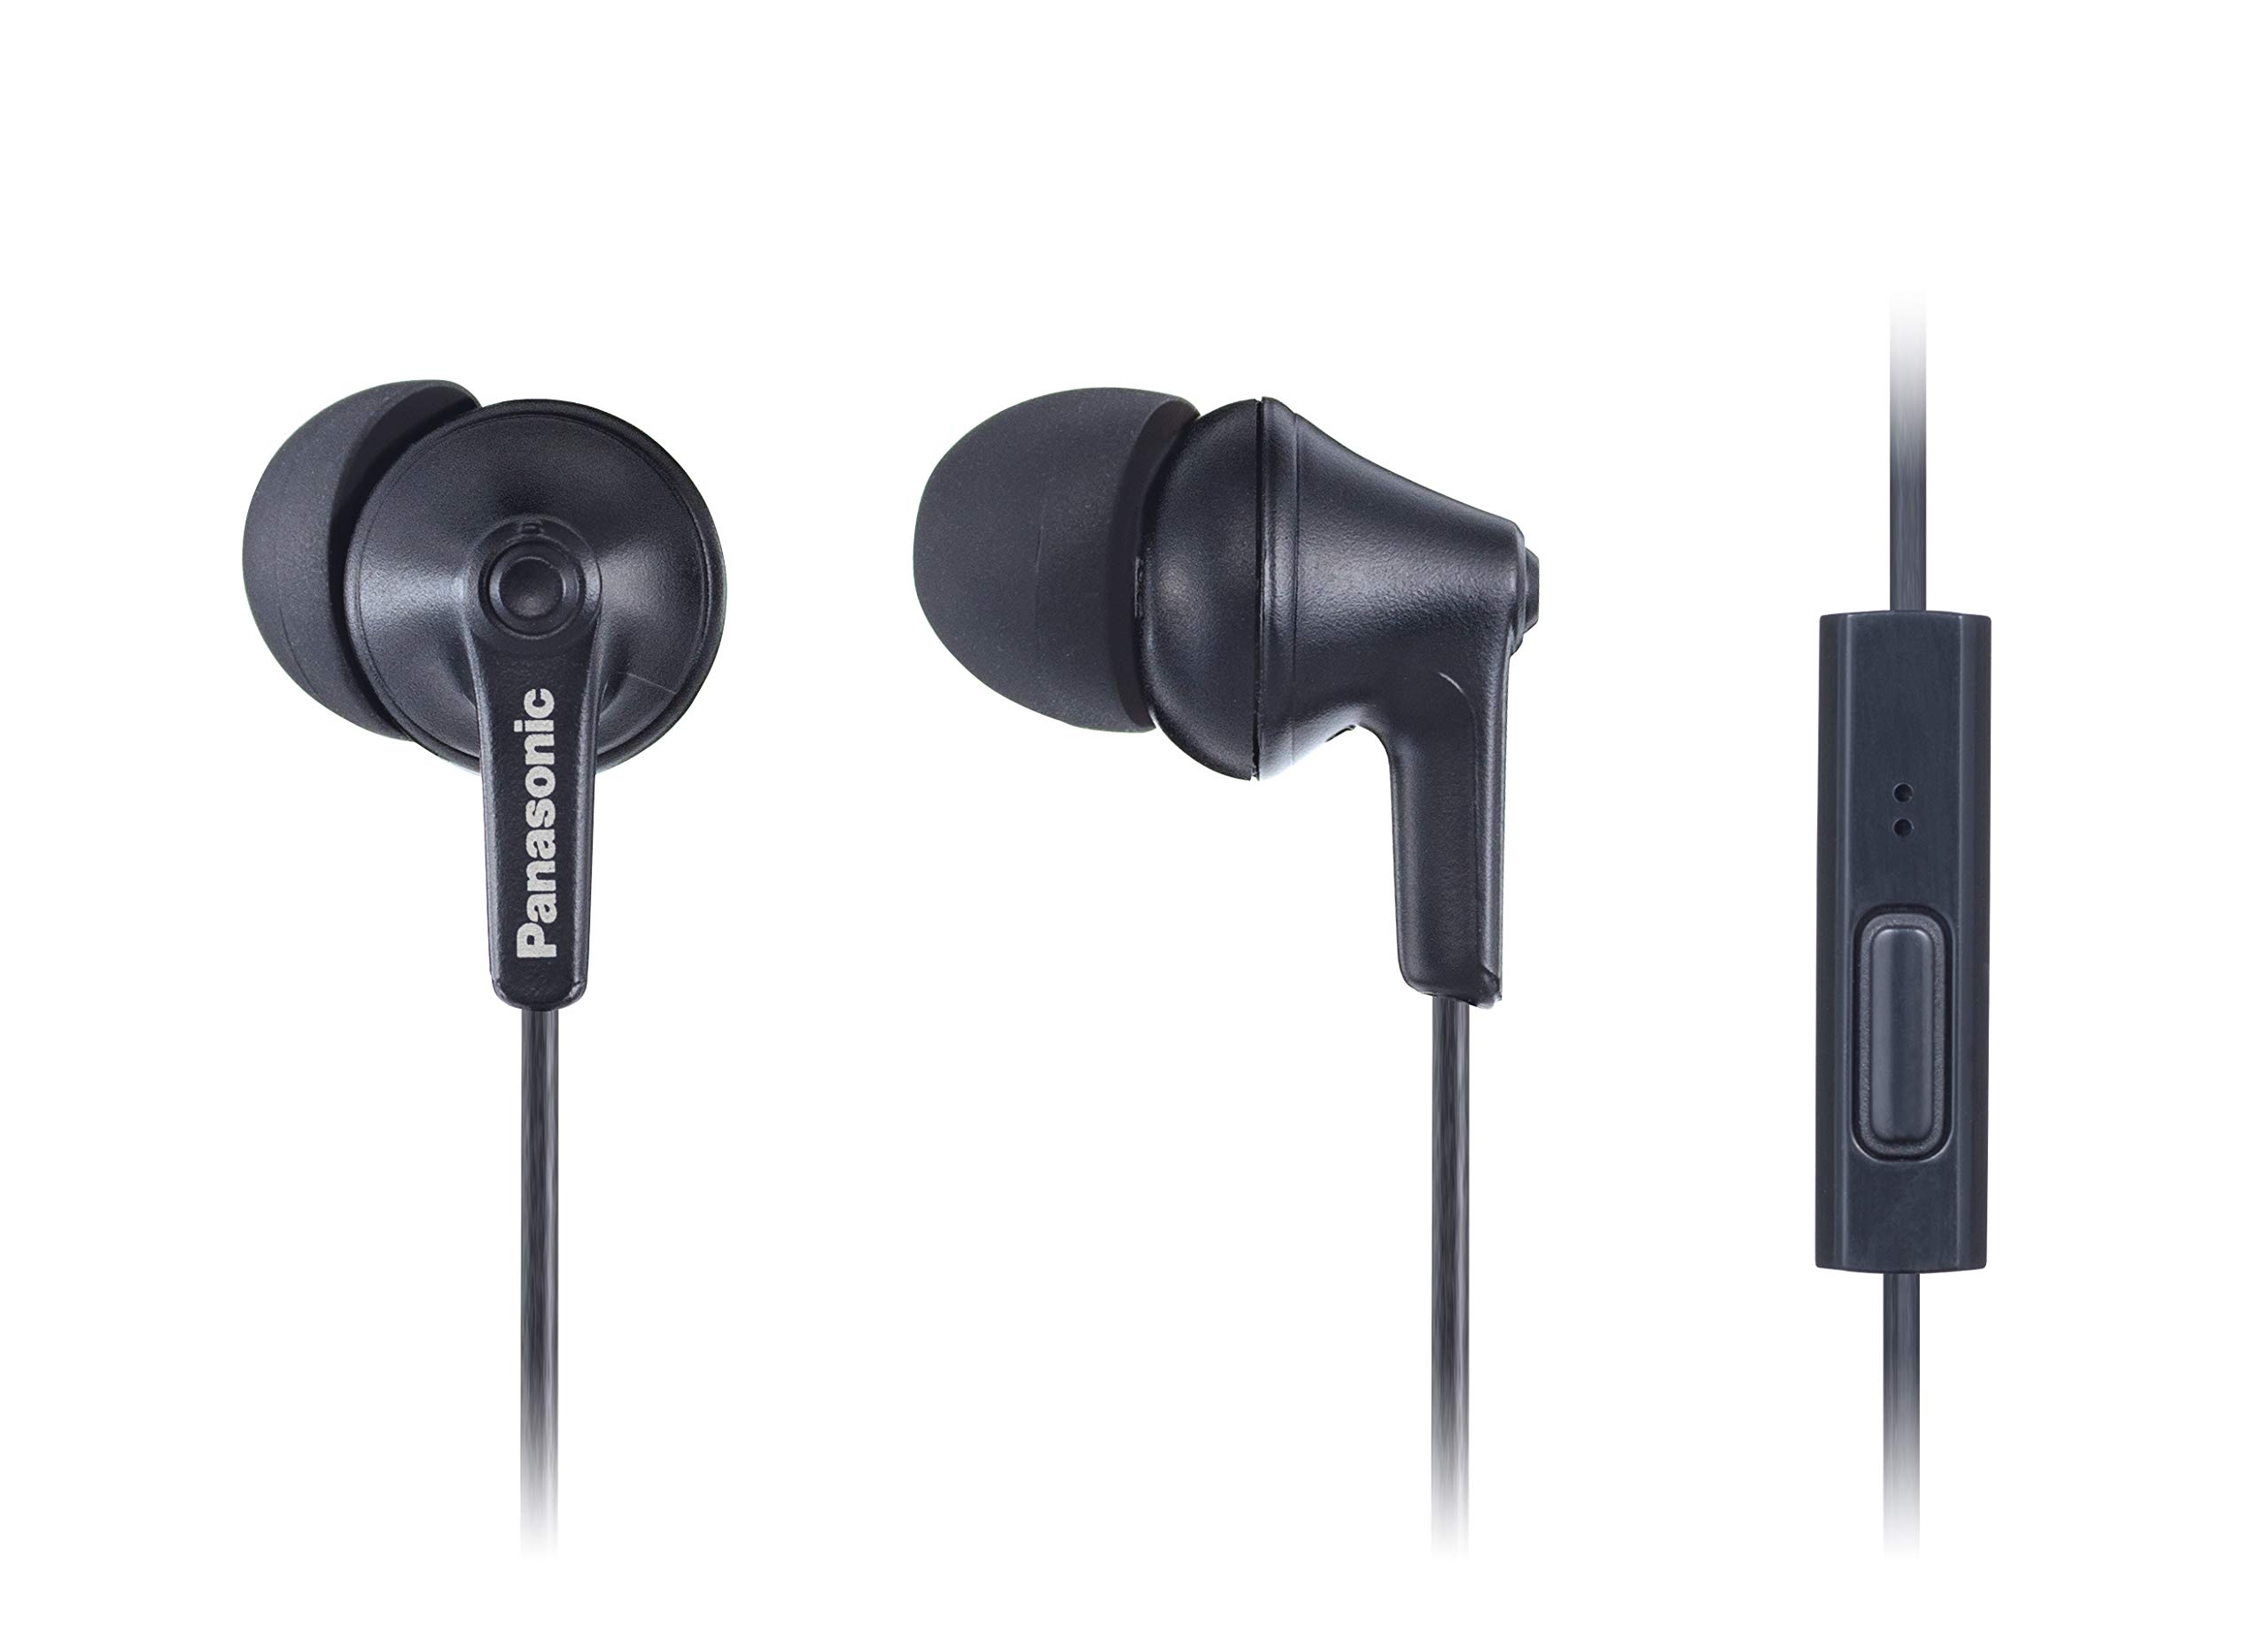
If you have a gaming headset lying around the house, you should also consider using that. Most reputable gaming brands such as Steelseries, HyperX and Razer offer better microphones than you’d find even on something much more expensive like Airpods. With that being said though, we don’t recommend that you go out and buy one of these headsets just for the purpose of recording video tutorials.
Instead, if you’re looking to spend money on a recording set up, your money would be much better spent on a dedicated microphone.
What microphone should I buy to record instructional videos?
There are dozens of different microphone types and models available out there, with prices ranging from $20 to thousands of dollars. Getting into the nitty gritty details would be too much for even a series of blog posts, so instead we’ll just focus on what the easiest to set up options are and what to look out for when buying a microphone.
Before you start looking for a microphone, you need to keep in mind that there are two types of microphone connections out there:
- XLR - These tend to be cheaper and better, but they require you to purchase an additional Audio Interface in order to use them with your computer.
- USB - A bit more expensive than their XLR counterparts and with slightly worse sound quality, these are popular with beginners and amateurs since they plug directly into your computer and can be used right out of the box. It’s probably what your favorite amateur YouTubers or weekend Twitch streamers are using.
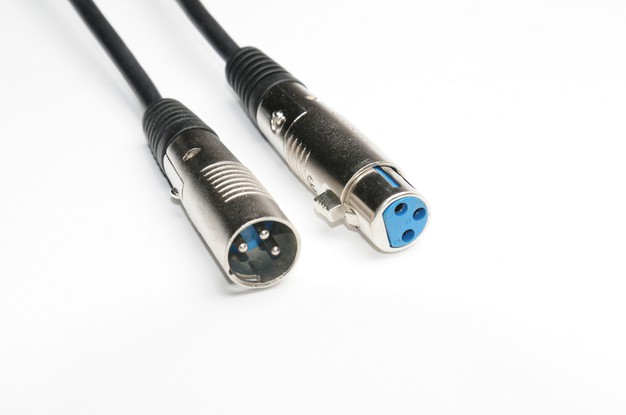
If you don’t want to delve into the world of audio engineering and spend time researching various interfaces, we recommend going for a USB mic. You can plug them into any computer or laptop and they will simply work, making them a lot more versatile, not to mention that to most people, the subtle differences in audio quality between USB and XLR won’t be noticeable at all.
That being said, there’s one more thing you need to know about microphones. They also mainly come in two flavors:
- Dynamic microphones - Better at rejecting background noise, require you to talk directly into them.
- Condenser microphones - Fuller sound, but they pick up A LOT of background noises, from mouse clicks to your chair creaking or your neighbor’s dog barking.
Condenser microphones are generally better for treated rooms and small home-studios. If you’re not interested in building one of those (or recording in your clothes closet), we recommend going for a USB dynamic microphone instead.
If you want some quick recommendations, the Samson Q2U or Audio Technica ATR2100x are probably the best if you can find them for less than $100. They also have the added advantage of having both a USB and XLR connection, in case you want to upgrade to switch to using an Audio Interface for a cleaner sound later on.
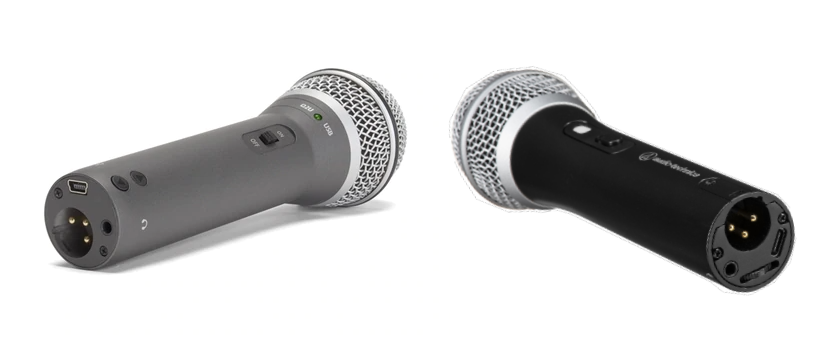
If you want to do your own shopping and comparison, just look for “USB dynamic cardioid mic” on your favorite online store.
NOTE: “Cardioid” means that your mic picks up sounds coming from the front and tries to block out the ones coming from the back and sides of the microphone. This means it picks up less background noise. Unless you have a guest over, always go for a microphone that has a “cardioid (or supercardioid) polar pattern”.
If you really want to use a condenser microphone instead, or can’t find any dynamic USB mics, then the most popular options are the Blue Yeti, Blue Snowball, Audio Technica AT2020 USB+ and Rode NT USB.

You’ve probably seen these used before by YouTubers or streamers. You should generally be able to find them for under $100 and they offer great sound quality for the price, with the main caveat being that you’ll have to do a bit of editing during post production to get rid of all the background noise they’ll most likely pick up.
How do I connect the microphone to my computer?
If you went for a USB microphone, connecting it to your computer should be as easy as plugging it into one of your computer’s many USB ports.
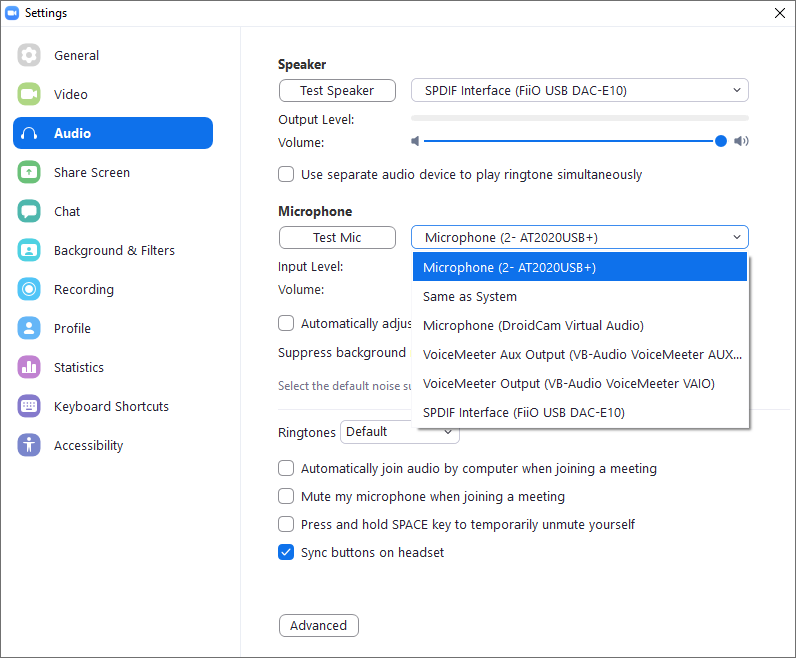
If you plugged it in but you aren’t sure that your computer is recognizing your brand new mic, just open up your favorite online chat program, go to the voice settings and see if you can find it in the drop-down list.
How to get the best audio
Now your microphone is all set up and you’re ready to start recording your voice over. However, there are still a couple of things that you can do before you press that record button that will help you get better sound and save you some time later down the line.
We’ve written a more extensive article about this before, but if you’re in a hurry and don’t have the time to read that right now, here is what you need to take away from it:
1. Turn off anything noisy in the room.
2. Keep the microphone OFF your desk if possible. A cheap, 10 dollars boom arm will work well to dampen any bumps to your desk while recording, as well as keep the microphone further away from your loud keyboard and closer to your mouth.
3. Keep the mic with its back turned to any noise source. We already mentioned earlier that cardioid microphones are made to reject noises from behind them, so make sure to turn their back to your loud computer to minimize background noise.
4. Keep the microphone within a few inches of your mouth. Dynamic microphones sound best when they’re close to your face. Don’t sit too far away from the mic or your voice will sound tinny and echo-ey.
5. Make sure you’re using the right side of the microphone. Depending on your mic, you’re either supposed to speak into the end of it, or into the side. Make sure to check the box and see whether your microphone is “top addressed” or “side-addressed” before you start recording if you want your voice to sound good.
6. Sit still while recording. You don’t need to be frozen in place, but especially for dynamic microphones, it’s important that you don’t move your head relative to the mic a lot, since it can drastically alter the way your voice sounds.
Recording your voice for the instructional video
Now that everything’s set up, it’s time to start doing the actual recording.
There’s a lot of programs that allow you to record your voice using your computer. If you want to do a lot of advanced post production and editing to the audio before adding it to your video, we recommend checking out our Audacity tutorial here.
If you want something that’s faster and simpler, we recommend recording your audio straight into Flixier. This way, you don’t have to install any apps (Flixier runs in your browser) and you can add the audio to the clip immediately and continue editing your video right after.
To start recording your audio, open up the Library, click on the big blue Record button and then select the Audio option.
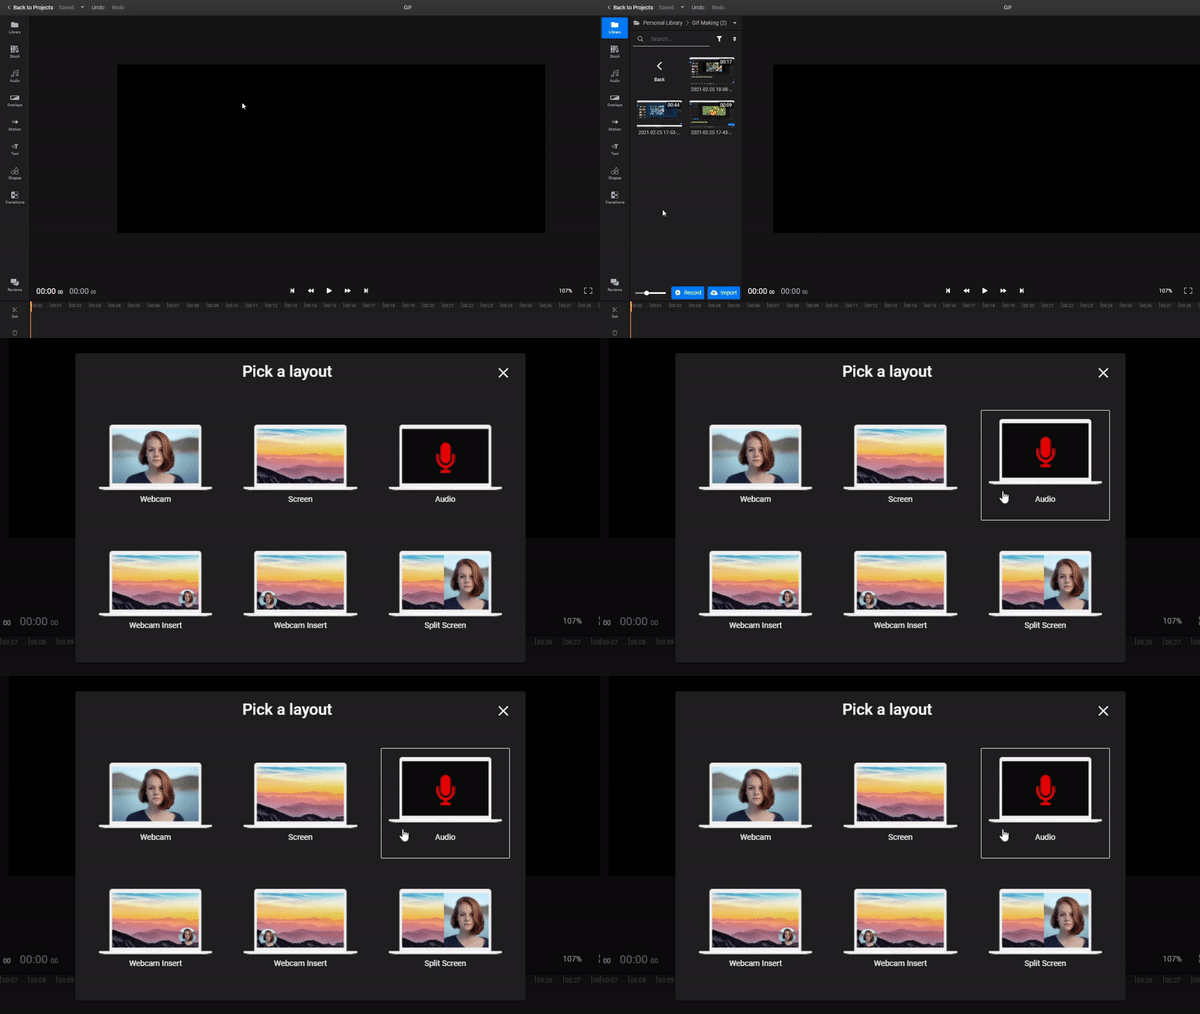
Click on the cog wheel icon in the lower left corner of this menu and make sure you have the right microphone selected.
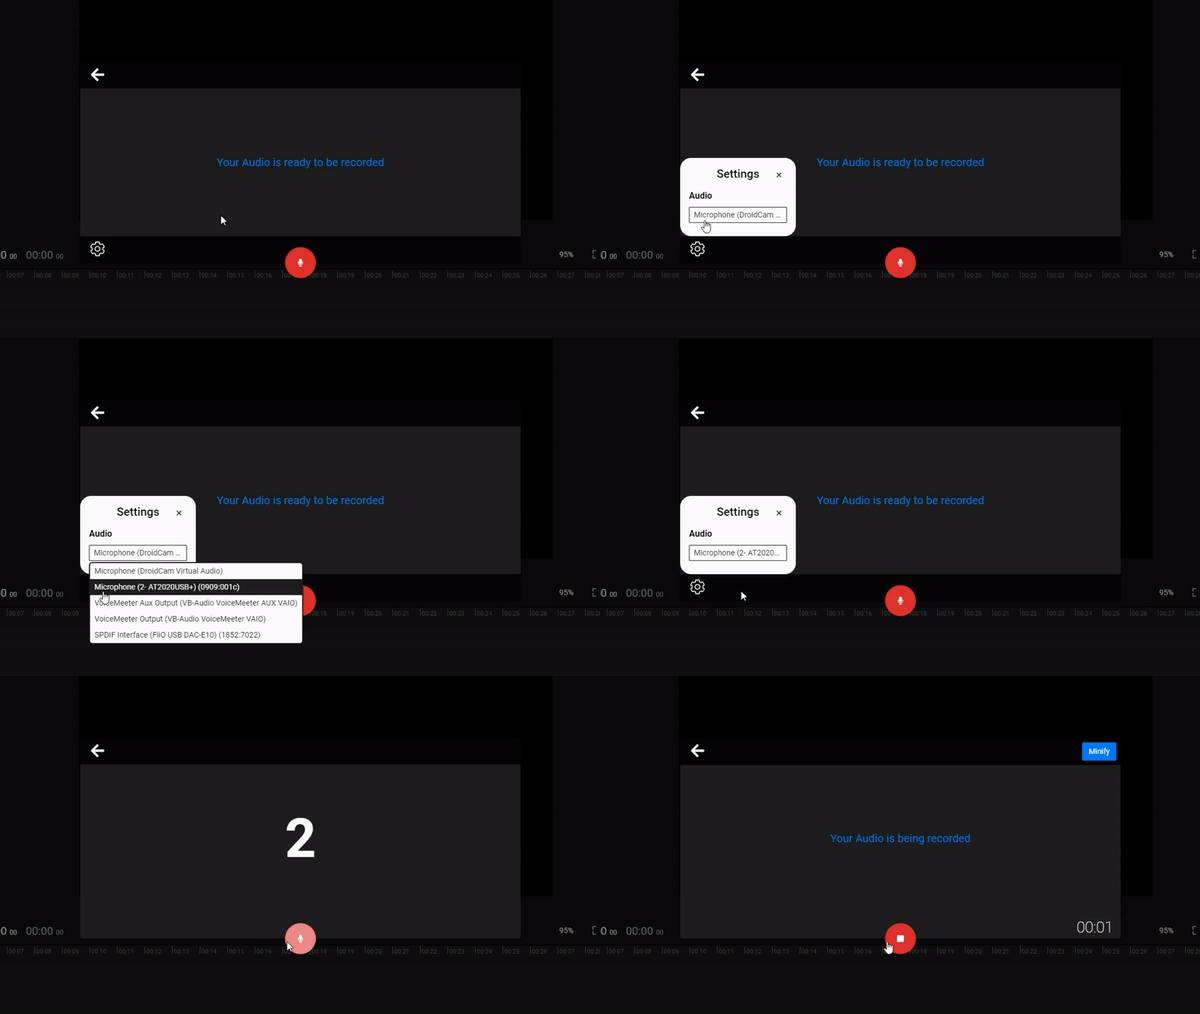
Click the red microphone icon and Flixier will start recording your audio. You can even Minify the recording window by clicking on the Minify button in the upper right corner.
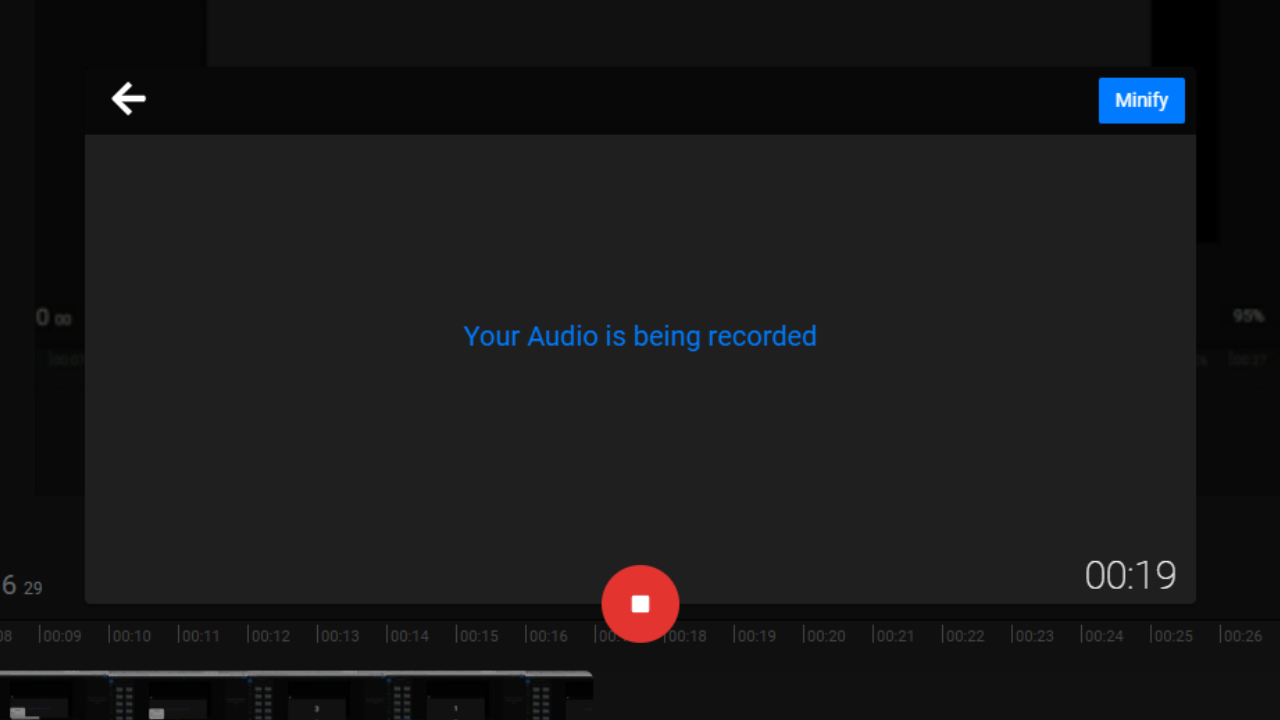
NOTE: If you make any mistakes while recording, don’t stop and start over. Just repeat the thing you got wrong and keep on going. You can cut out the portions you got wrong when you edit your video.
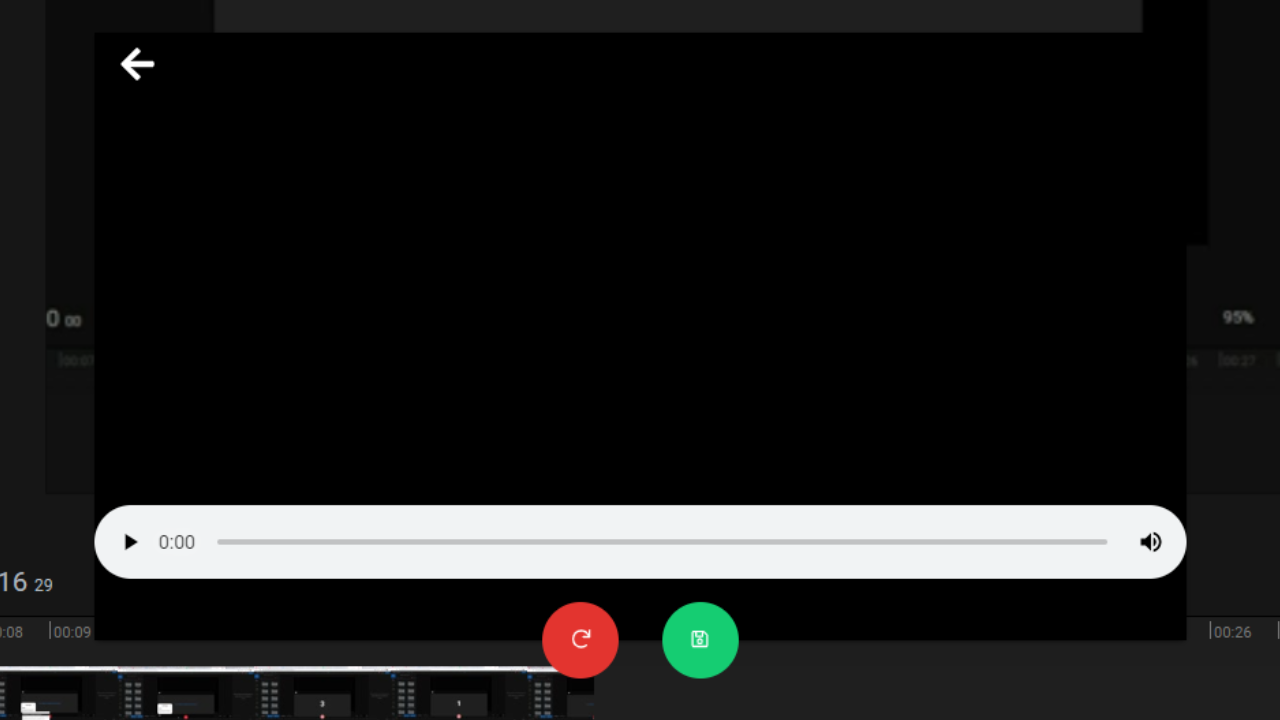
Click on the red stop button when you’ve finished recording.
A window will pop up allowing you to preview your audio clip. Clicking the red reset button will allow you to record another take, while the green save button will add your audio clip to the Flixier library.
How to edit your voice recording
Now that you’ve finished recording the audio for your instructional video, you can drag it from your library down to the timeline and start editing it just like you would any other media.
You can cut it, trim it, and edit out any mistakes until you’re left with a perfect track.
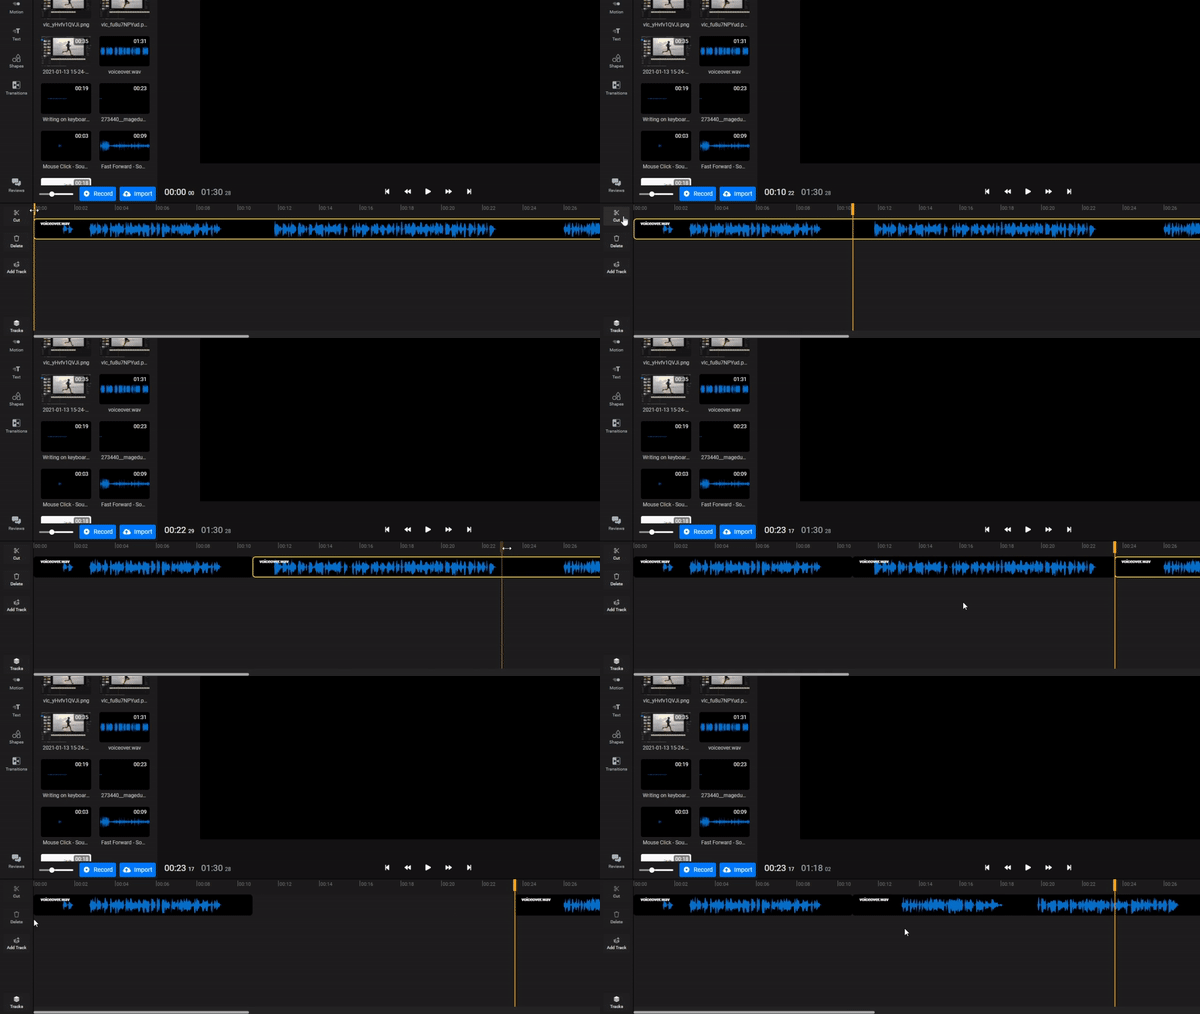
If you want to improve the clarity, click on it in the timeline and select the Vocals preset from the Equalizer menu on the right side of the screen.
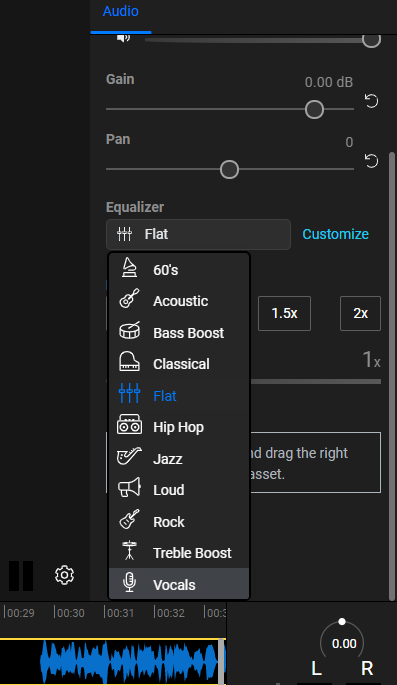
If you want to learn more about the audio settings available in Flixier, feel free to check out this video from our YouTube channel below:
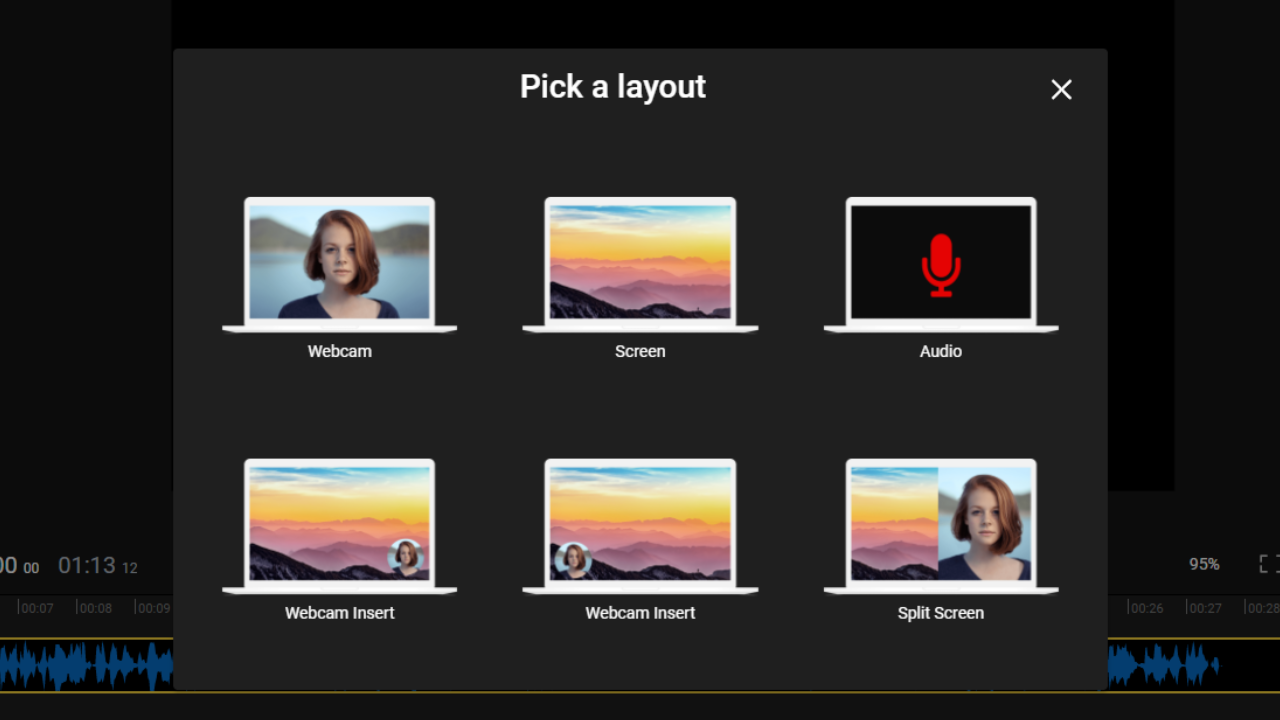
The next step is choosing whether you want to record the entire screen, only a certain application or a specific Google Chrome tab. This is all up to you, of course. If you’re not going to be switching between multiple apps, we recommend recording one specific application since the final video will look cleaner without the taskbar and other distractions showing.
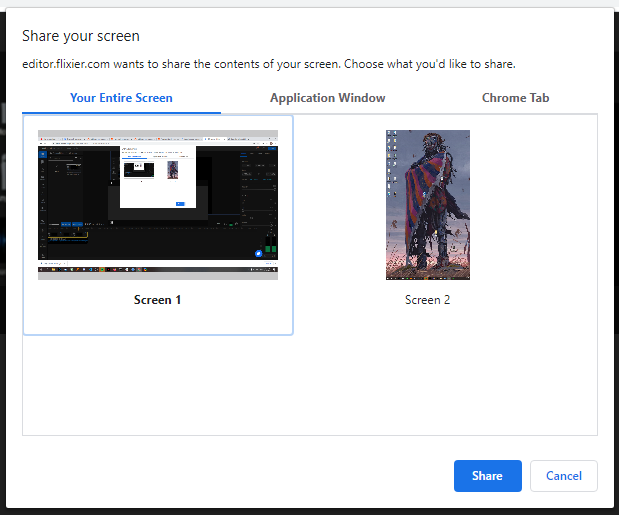
After you’ve chosen which screen area you want to record, click on the red button to start recording.
A timer will appear in the upper right corner of your screen, alongside a red stop button. You can press the button to stop recording.
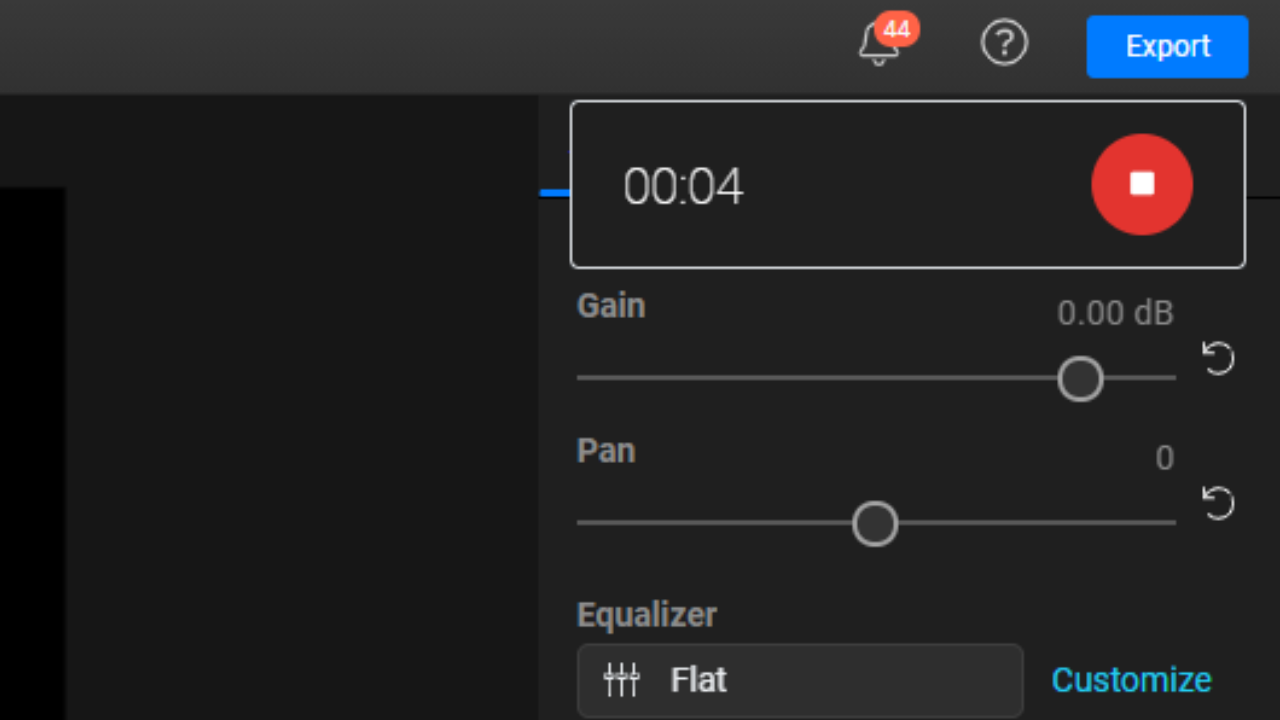
After you stop recording, a menu will pop up giving you a chance to preview your screen recording and either start over or save it to your Flixier library.
Once your screen recording has been added to the Flixier library, you can drag it down to the timeline and edit it alongside your audio clip.
NOTE: Flixier also lets you record both your screen and your microphone at the same time. All you need to do is click on the cog wheel icon before you start recording and choose your microphone from the Audio dropdown list.
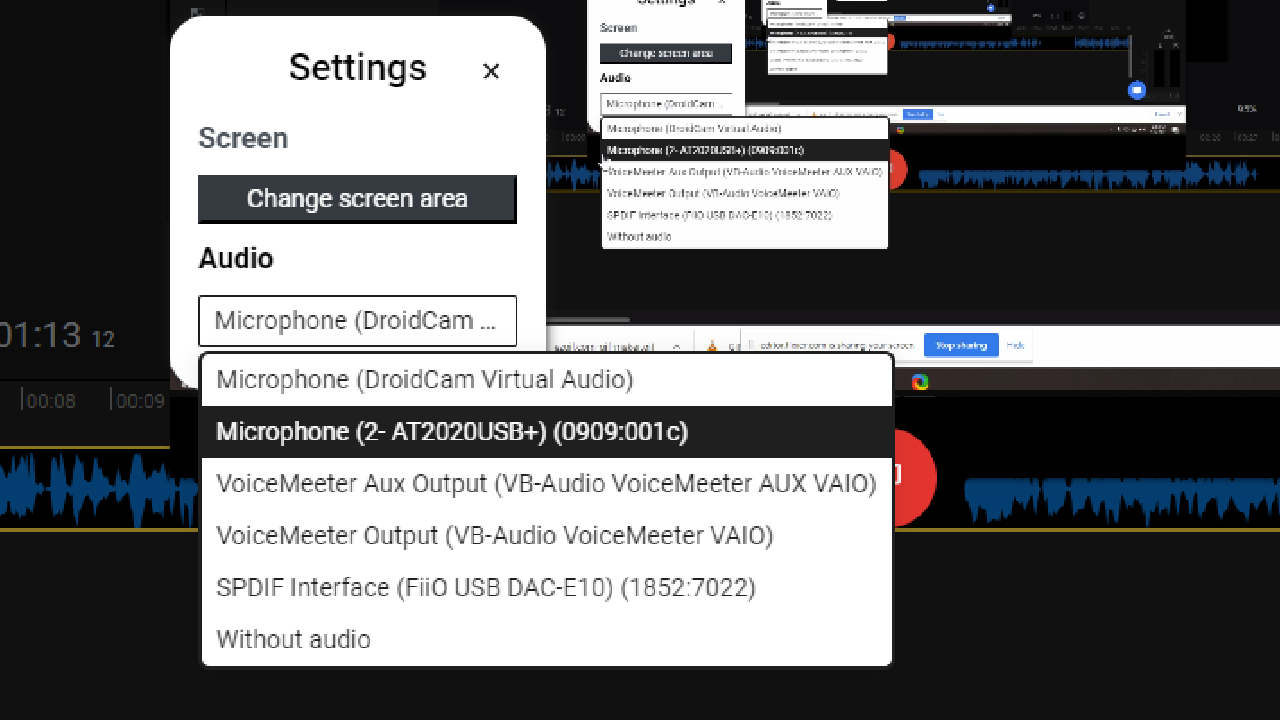
The reason we recommend recording audio and video separately, however, is that reading off a script tends to lead to less mistakes and help you sound a lot more confident and professional when narrating.
Now that you have both your audio and video recorded, it’s time to take a look at how to sync them both together.
Step 5: Editing your video tutorial
How do I sync my Audio and Screen Recordings together?
If you recorded your screen and your voice over separately, the first step you need to take when editing will be syncing your audio and video together.
Normally, doing this can be a bit of a cumbersome process, but Flixier makes it extremely easy by giving you a fast way to insert freeze frames, trim videos and change the playback speed of clips.
Here’s how we sync our audio and video when making the video tutorials you see over on our YouTube channel:
To start off, make sure you have your final voice over and video tracks added to your project.
You can have them starting at the same time. Then, just play the video back and look out for any discrepancies between the two.
If you want something to stay on screen for longer, just move the playhead there, right click on the video track and click Insert Freeze frame, then drag on it to adjust the duration of the effect to match your voice over.
If you want to cut something out of your video, move the playhead to the cut location and either click the Cut button or press S on your keyboard. Then, just drag the edge of the first clip back to get rid of the unwanted footage.
To close in the gap between the two clips, either drag them back together or right click and select Ripple Collapse.
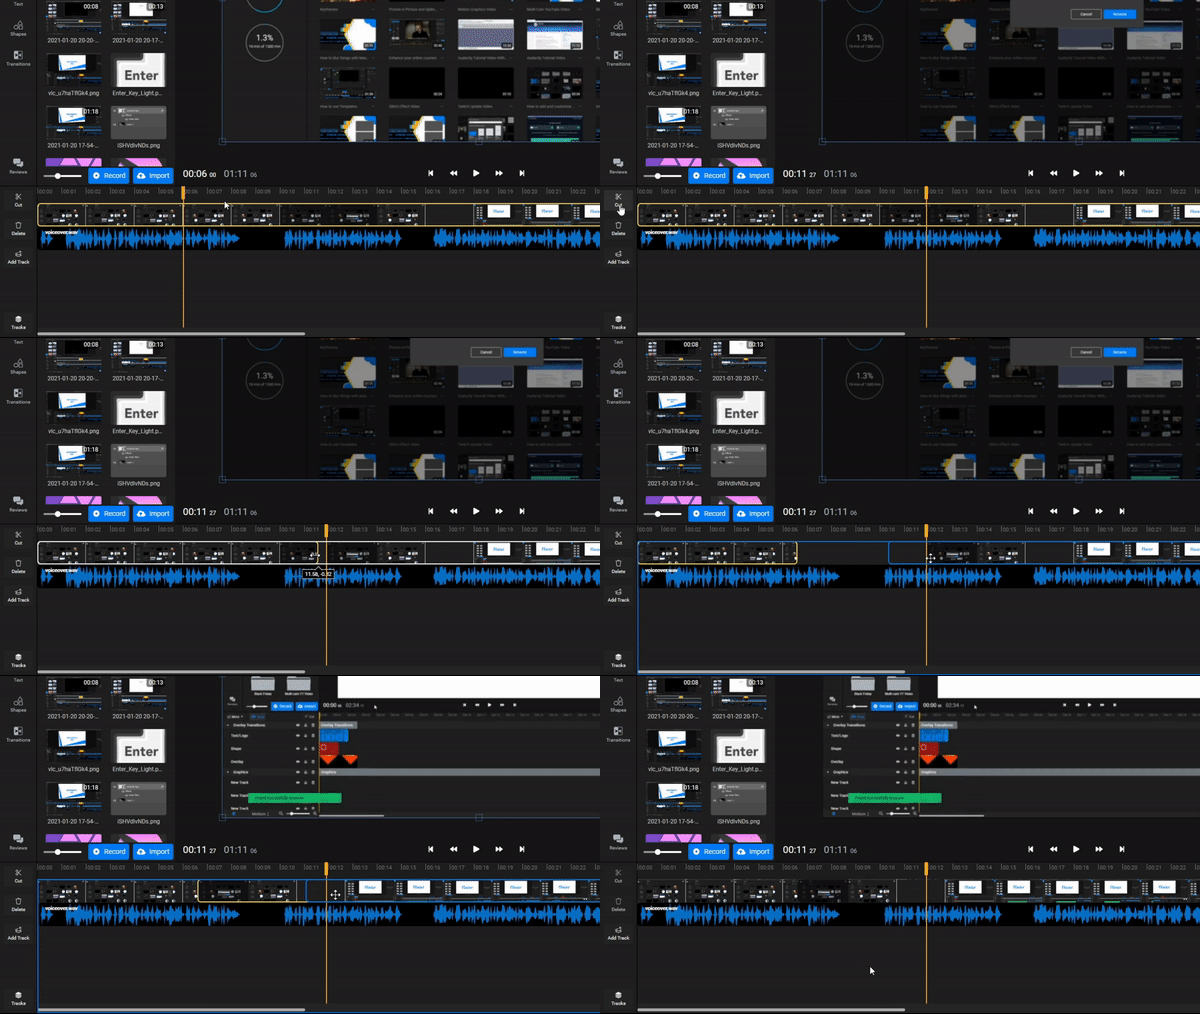
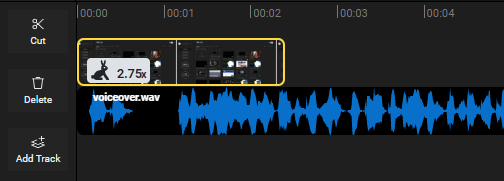
If you want to slow down a video or fast forward it, all you have to do is cut the segment out and then hold Shift while dragging on its edges on the timeline. An icon will appear on the video thumbnail showing you the new playback speed.
Lastly, don’t be afraid to split your audio into multiple pieces and cut it as well. Cutting an audio track works exactly like cutting a video, which can be useful if you need to add pauses in order to sync it with the video, or do the opposite and cut out long silences.
How do I add transitions to my video tutorial?
After you’ve got your audio and video all synced, it’s time to start working on the finer details.
If you want to add transitions to your video, you can just drag two tracks together until they overlap and then click on the overlapping portion to choose a transition from the drop down list.
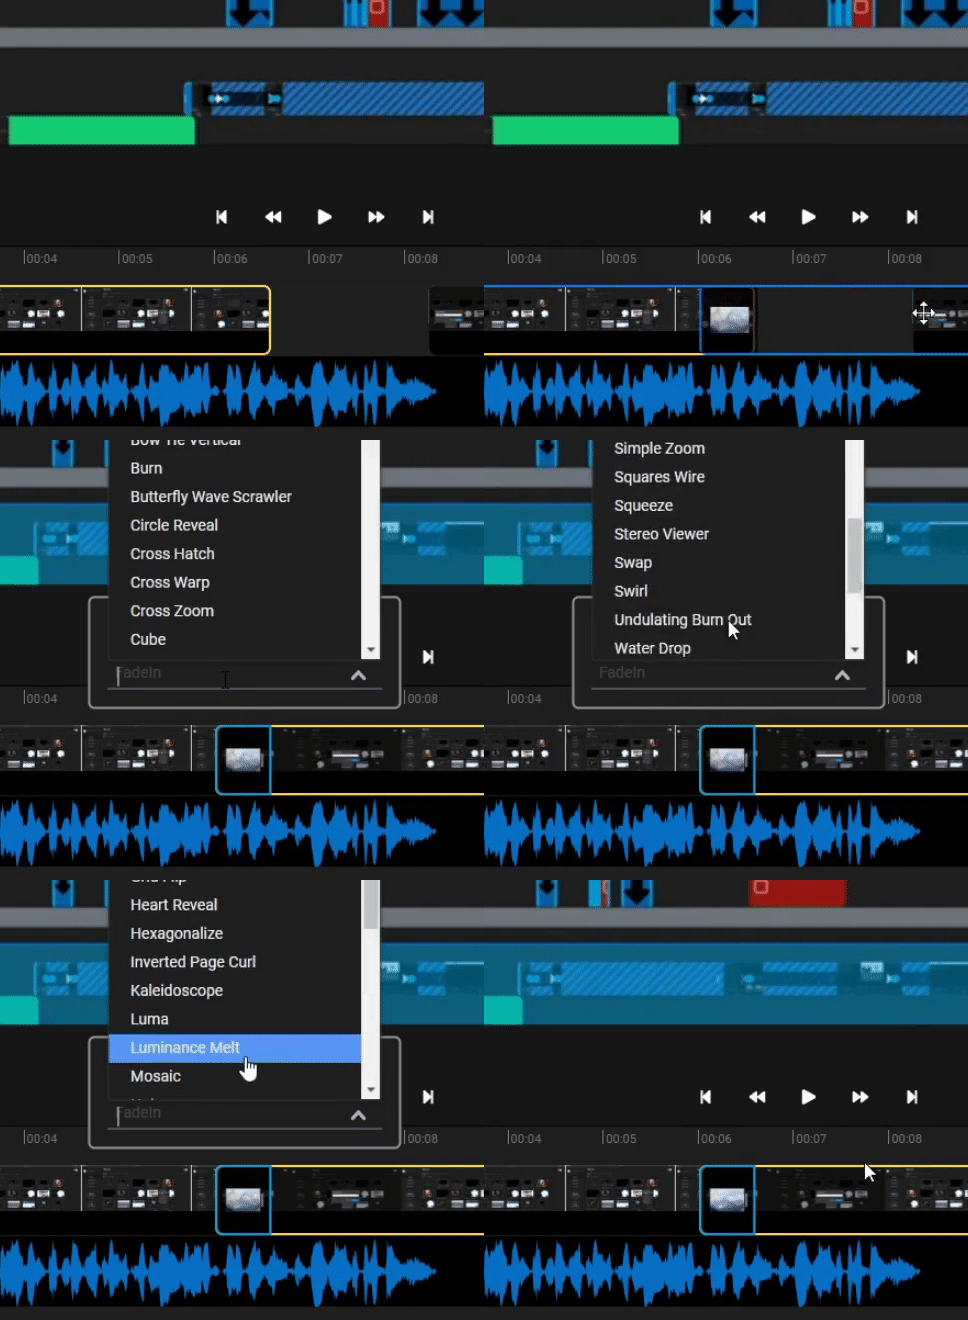
Flixier has more than 20 free transitions for you to choose from, but considering that this is an instructional video, we recommend sticking with something simple like a fade, since you don’t want your viewers to be too distracted.
How can I crop a video recording?
Once you're done recording your screen, you might find yourself wanting to crop the footage for various reasons. Maybe it's too frame the video in a way that lets the viewer focus on the most important area of the screen, or maybe it's to leave out some confidential info that might be popping up in your notification area. Luckily for you, it's incredibly easy to crop video with Flixier!
All you need to do is select your clip on the Timeline, then, in the menu on the right side of the screen, scroll down until you see the Crop option and use the sliders to crop your video to the right size and shape!
Afterwards, you can use the mouse to drag on it's edges and stretch it in order to fit on the canvas the right way!
How do I add text, shapes and images to my instructional video?
Studies show that the majority of people are visual learners. While watching instructional videos is a visual form of learning in and of itself, you can contribute to that even further by annotating your videos.

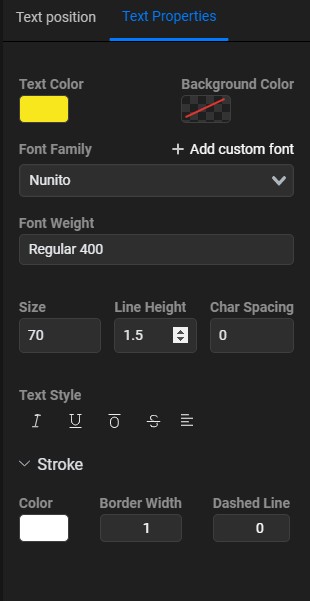
Text works the exact same way, just click on Add Simple Text, type in whatever you want and then use the Text Properties menu to choose from over 1000 different font families.
We also have a comprehensive shapes menu that allows you to easily add visual elements such as arrows and arrows in order to highlight key information and your video and direct the viewer’s attention to where it’s needed.
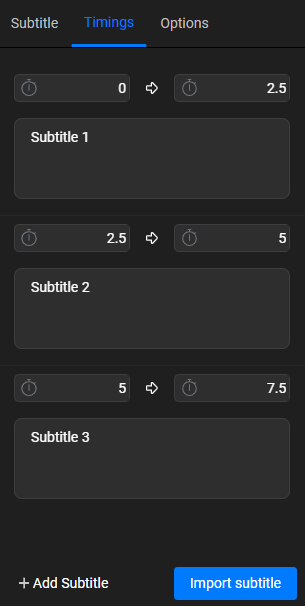
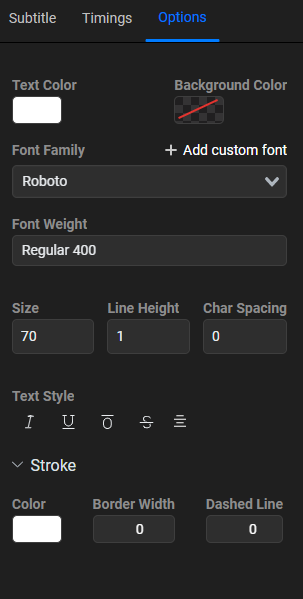
You can also customize the color, font and alignment of your subtitles just like you would any other text element in your video, by clicking on the Options tab on the right side of the screen.
How to auto-generate subtitles for your video tutorial
If you're making a long video and don't want to write all of the subtitles manually, you're in luck! One of the latest Flixier updates features a fully automatic subtitle generation option! All you need to do add subtitles to video this way is right click on your Audio clip on the Timeline and select the Generate Subtitles option! Our cloud-powered systems will generate the fully synced subtitles for that clip in a matter of seconds and you'll be able to edit them just like you would any other subtitles you made with Flixier!
Step 6: Share your instructional video with the world
Now that you finished editing your instructional video, it’s time to share it with the world!
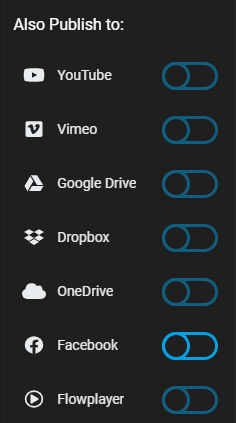
You can upload it to YouTube, Facebook or Vimeo easily straight from the export screen! Just enable it and your video will automatically be published to said platforms once exporting finishes (which is only going to take a couple of minutes).
Before you click that export button, though, you need to keep in mind that simply putting your video out there won’t be enough for people to find it and watch it. You’ll need to give it a good title, thumbnail and description to make it easy to find by people looking up their problems on YouTube or Google.
We’ve already written a guide on how to get your videos easily discovered in the past, so if you want to get detailed tips and tricks, we recommend checking that out.
For the purposes of this article, however, we’ll keep it short and simple and give you some basic advice to get you started on the path of video SEO.
1. Make sure your video has the right keywords in the title and description
Remember when we told you to take note of the words people use when expressing their problems online? The same problems that your videos will help them solve?
Well, that advice comes in handy again. Make sure your title is worded as an answer to those very same questions.
Let’s say you notice a lot of people are going online and asking “How do I edit my YouTube videos?” and you decide to make a video tutorial about it. Giving it a title like “How to edit YouTube videos easily” is bound to get you more views and clicks than if you named it “Adding Intros, Cutting and Audio Enhancements - The Beginner’s Guide to Video Editing”.
Similarly, your video description should contain the same keywords as the title, as well as give a brief explanation of what the video is going to be about. That way people can get an idea of what they’re going to learn and quickly decide whether or not your instructional video is what they’re looking for or not.
NOTE: If you’re uploading your instructional video to YouTube, you should know that the platform now allows you to break your video up into chapters. Just enter a timestamp into the description followed by the Chapter Name and the Chapters will appear in the YouTube player interface as well as Google Results, allowing people to easily find what they’re looking for in longer videos.

2. Take the time to make a nice thumbnail
It might be tempting to just use a still from your video as the thumbnail. While that would save you some time, if you want people to actually click on your video, it’s much better to take a bit of time and make a nice thumbnail.
As opposed to the title and description, thumbnails are only meant to appeal to the human element, not YouTube’s search algorithm.
This makes the task of creating an effective thumbnail a little more subjective, although there are still some guidelines that you can follow to increase your chances of success.
The main thing to keep in mind here is that your video thumbnails need to pop. Most of the time, your video will only appear to people in a sea of other clips, so you need to make sure that your thumbnail sets it apart from the crowd.
Solid colors work best! Red, green, yellow and blue are considered to be the best colors to use as a background!
Text should be kept to a minimum. That’s what the title is for! If you do include text, make sure to make the letters big, since thumbnails tend to be pretty tiny, even when viewed on large screens.
3. Share your video with the right people
Lastly, don’t forget to share your video in the right places? If you’re making audio editing tutorials for musicians, don’t be afraid to answer questions and drop a link to your own video in a Facebook or Reddit thread where someone is asking for help.
Self-promoting is often frowned upon, but if your video is good, relevant and provides real value, people are definitely going to appreciate it.
Closing Words
Thank you for making it this far! This has definitely been a long guide, but we wanted to guide you through every step of the process. Now that you made it all the way through, get out there and start creating your own instructional videos, guides and tutorials!
If you want to learn more about video editing and production or simply get some inspiration from our instructional videos, feel free to check out and subscribe to our YouTube channel!
Dan is passionate about all things tech. He’s always curious about how things work and enjoys writing in-depth guides to help people on their content creation journey.


