Increase Your Earnings Through Vlogging. Full Guide for 2022
Updated on June 1, 2025


So, you’ve decided to become a vlogger. That’s great! But while big YouTubers can make the job look easy, the truth is that starting a brand new channel can be a bit more involved than it initially seems.
Don’t worry, though! This complete guide is going to provide information that will help you get the best start possible in your new venture.
How do I become a vlogger?
The best answer to this question is to just do it. We know, it seems anti-climatic, but while doing research and getting prepared is important, you should never allow it to distract you from your main goal. After all, it’s the videos that are going to get you views, not your knowledge.
With that being said, we do encourage you to keep reading and learn more in order to prepare yourself for the journey ahead. Learning by doing is great, but a little help and preparation will give you a boost in a market that’s already pretty saturated. Speaking of which…
Plan your content
Stand out from the crowd
When you decide to become a vlogger, you need to think about how your content will stand out and differentiate itself from the older, established vlog channels. You can’t afford to do the exact same things they do, because people will just watch them instead. You need to bring something new to the table.
This can be anything: maybe you live a unique lifestyle that people would be interested in. Maybe you work an unusual job. Maybe your personality helps you shed a new perspective on things, or maybe you’re very involved in certain hobbies and your videos can contribute to those communities.
No matter what it is, it’s very important for you to find what separates you from the crowd and capitalize on it. Established YouTubers can afford to upload generic videos because they already have a large following that will watch them no matter what. You’re starting out from scratch, so you need to get people’s attention.
Plan your videos ahead of time
Consistency is key when it comes to starting out on YouTube. There’s nothing worse than trying to come up with new ideas while you’re under the constant pressure of having to upload a new video.
Naturally, the more you do it, the easier it gets, but for starters it’s a very good idea to try and come up with at least one hundred video ideas before you start your channel. It might seem a little overkill, but trust me, you’ll burn through them fast.
They don’t all have to be great ideas. As you go on making videos, you’ll naturally get more ideas that end up pushing others on your initial list to the side. The idea here is to keep you from ending up in a situation where you don’t know what to do next. A solid content pool will help you stay productive.
What tools do I need to become a successful vlogger?
So, you’ve set up a content pool with plenty of videos to choose from and you’re ready to start working on your first vlogs. This is the point where a lot of people get lost in the technicalities. What camera do I pick? What’s the best microphone? How do I set everything up? Don’t worry!
We’ll go through each of these topics one by one and provide you with simple, cost-effective solutions to give you a good start.
What is the best camera to start vlogging?
Best budget camera for vlogging
The best budget camera to start vlogging with is definitely the one on your phone. If you have a phone that was made in the last 5 years, it’s going to be more than capable of taking crisp, full HD footage, provided you have good lighting.
You might be tempted to buy a camera, but the truth is you’ll be hard pressed to find something that takes noticeably better videos than a phone without spending at least $600 and dealing with things like dummy batteries, lenses, tripods and capture cards.
Another advantage of using your phone is that it’s relatively small. If you’re doing travel vlogging, you can use a selfie stick or just hold it in your hand. If you’re gonna be stationary, just get a cheap tripod and add a phone mount on top of it.

Tips for making vlogs on your phone:
- Use the back camera. The selfie cams usually have lower quality and tend to stretch the image slightly.
- When buying a phone mount for your tripod, get one that has a screw system to adjust the clamp force. Avoid the cheap plastic ones that use metal springs since they tend to break easily.
- Some phones can only capture 4K videos for short periods of time. If you wanna go above 1080p, check online to see if your phone has such a limit.
- ADVANCED TIP: If you want to see yourself while recording, connect your phone up to a laptop using USB, use an app like DroidCam to use the phone as a webcam and then feed the DroidCam footage into OBS to record it that way.
Best webcam for vlogging
If you really don’t want to use your phone, then a webcam is an affordable solution, as long as you don’t mind being “tied up” to a computer at all times.
Unfortunately, the webcam market has stagnated in the last few years, so there are really only three options worth recommending in 2022:
- Logitech C920 - $90
- Logitech Brio 4K - $200
- Elgato Facecam - $200

Now as far as image quality goes, all these are pretty much identical for the purpose of vlogging. The main differences are as follows:
- The Brio shoots in 4K, while the other ones only record in 1080p. This can help you crop the image down to 1080p afterwards for better framing.
- The Facecam and Brio have marginally better colors and low-light performance than the C920.
- Elgato’s software comes with some bells and whistles that are mostly aimed at streamers, but might come in handy if you’re already invested in their ecosystem of products.
In conclusion, the best value option as far as vlogging webcams go is the Logitech C920. Getting it over the others is a safe bet and will allow you to have some money left over to spend on lights.
Best professional video cameras for vlogging
If you don't mind buying and operating a dedicated camera for your vlog, then there are a couple of options you can take into consideration. If you need something that's portable, and can take a beating, a GoPro is your best bet. It has decent battery life, you can easily mount it on anything and it will allow you to record everything without having to use your phone.
If you're looking for the best picture quality, then you'll need to venture into the realm of camcorders, lenses and mirrorless cameras. The topic is beyond the scope of this guide, but here are some things you need to keep in mind if you decide to get one:
- How long the camera can film without overheating - This is very important, since a lot of cameras commonly used for content creation, like the Sony a5100 or the a6000 series overheat after more than 10 minutes of continuous filming. If you're going to be filming long, uninterrupted shots, consider a camcorder or look your camera model up online to make sure it won't die on you halfway through a vlog.
- Mic inputs - If you're only filming yourself, check to see whether or not your camera has a microphone input so your audio and video are automatically synced. If it doesn't, you'll need to buy an external recorder and then sync the audio during editing.
- A camera grip - Holding the camera in your hand can result in very shaky footage, especially if you're not an experienced videographer. A grip, especially one that has a stabilizer, can be a huge help.
How to get the best video quality in your vlogs
To get the best video quality for your vlogs you’re going to need good lighting. You could spend thousands of dollars on mirrorless cameras and lenses and your videos would still look atrocious with bad lightning.
The power of the sun, in the palm of your hand
If you live somewhere sunny you can start off by filming yourself in front of a window. Make sure you have some semi-transparent curtains pulled over the windows to diffuse the light since filming in direct sunlight will likely be too bright for your camera and ruin the image.
If you don’t have white curtains, hanging a bed sheet over the window will do just fine.
The best lighting setup for vlogging
If you can’t use the sun to your advantage, it’s time to move onto the next best thing: artificial lighting. These may be a little cumbersome to have around the house, but the results are definitely going to be worth it.
To start off, check out this video about 3-point-lighting. It’s a very simple technique that’s used everywhere from vlogging to professional photography and understanding the principle behind it is essential to making sure you have decent lighting in your vlogs:
Option 1: A ring light
Ring lights offer good diffuse lighting. They make your skin look nice and they’re relatively small. If you have a set recording location you can get a bigger one and mount it on a tripod behind your camera. For mobile uses, you can get small phone-mounted ring lights that you can use on the go.
The main disadvantage with using ring lights is the halo effect in your eyes. They’ll constantly be reflecting off of your eyes, giving them an alien look that can be either cool or annoying, depending on your own tastes.
Option 2: Softboxes
These are the huge, pillowcase looking lights you often see on-set during professional photo-shoots. They’re a great source of soft, diffuse light and they’re probably going to make your skin look amazing, but they can be very expensive and they definitely take up a lot of space around the house.

Option 3: LED panels
LED panels are smaller than softboxes, but give off a harsh light. They also have the advantage of being easier to set up.
If you’re looking for lights that are easy to control from an app, check out the Elgato Key Light and Key Light Air. If you don’t mind sacrificing some convenience, you can also find plenty of solid LED lights from companies like Neewer or Godox for around $50.

PRO-TIP: If you want to get diffuse light from an LED panel, don’t point it directly at your face. Bounce the light of a wall or a sheet of white paper that’s behind the camera and relatively close to your face. You’ll notice this will make the lighting a lot softer and more flattering.
Option 4: just use desk lamps
You can still get more than decent lighting for your vlogs even without spending money on lights and light stands. Get two cheap desk lamps from your local store and bounce the light off of a wall or sheet of paper to diffuse it.
To get the best results, buy two cheap smart bulbs so you can control the light temperature and intensity using an app.
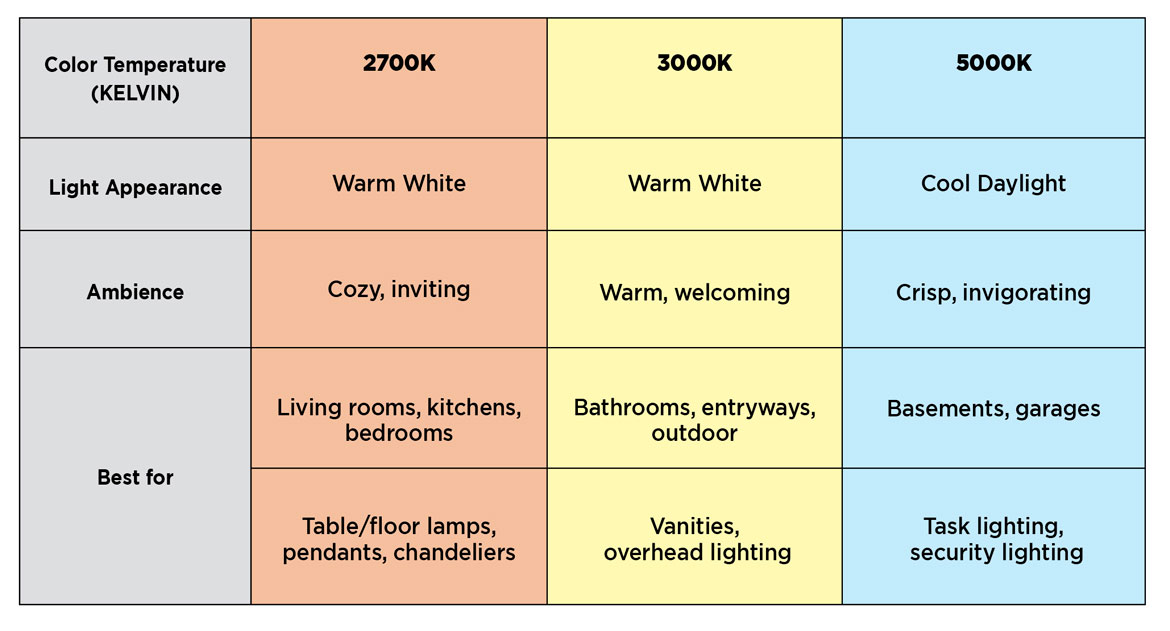
GENERAL LIGHTING TIP: When you’re buying lights, keep Color Temperature in mind. Color temperature determines whether the light has a blue, white or orange tint to it. Most LED lights have variable color temperatures which are indicated in the product description.
What are the best vlogging microphones?
Clear audio is crucial to getting your message across and keeping people engaged. While microphones are a very complex topic, we’ll do our best to sum it up nicely and help you start out without breaking the bank.
Best budget vlogging microphone
Boya BY-M1 Lavalier - $15
This is what’s called a lav mic. It’s small, it’s cheap and it clips onto your shirt. It punches way above its price range in sound quality and will be a huge improvement over your phone, camera or computer microphone, without breaking the bank. The best part is, you can hook these up to any device that has a jack, like a laptop, computer or phone.

Best budget XLR microphone for vlogging
Behringer XM8500 - $15
The XM8500 is just a great dynamic microphone for its price. It’s loud, crisp and gives most voices a nice warm tone. Add a cheap foam windscreen to prevent “popping” and you can definitely use it to get a crisp, pleasant sound.

NOTE: This is an XLR microphone, so you’ll need an audio interface in order to hook it up to your computer. This can be a hassle in the beginning but makes it easier to upgrade down the line.
Best USB microphones for vlogging
This is where things get a bit murky. USB microphones are generally more expensive than the other options we’ve presented, but what they offer is the convenience of being plug-and-play. You don’t need any audio interfaces for these, just plug them into your computer and you’re good to go.
Since the price and availability of these microphones tends to vary a lot depending on region, we’re just going to list a couple of good choices. Get whichever one is cheaper, they’re all great:
- Audio Technica AT2020 USB+
- Audio Technica 2005 USB
- HyperX QuadCast
- Samson Q2U
- Blue Yeti
How to get good audio for your vlog
No matter which microphone you choose, there are still some very important things you need to keep in mind when recording in order to get a good sound.
First off, there’s the things that you need to do before you ever press record. This means making sure you’re speaking into the right side of the microphone, keeping it close enough to your mouth, using a pop-filter or windscreen or placing it on a mic stand to prevent weird noises. If you want to learn more about mic technique, you can check out our in-depth article on the topic before you get started.
After you’re done recording, there’s the matter of editing your audio. Typically, this involves getting rid of excessive background noise, applying an EQ that’s flattering for your voice, and using compression to get rid of any unpleasant fluctuations in volume and make everything a little louder and more ‘crisp’. It might sound a little intimidating at first, but trust us, it’s a lot easier than it seems.
We even wrote a step-by-step guide that will guide you through the whole process using only free software!
Editing your first vlog
After you’re done recording, it’s time to edit your first vlog! Obviously, your editing style is going to be something you discover and refine along the way. Since it’s such a subjective topic, there’s no best way of doing things, but here are some pointers that can help you out:
- Don’t have a super long intro. Spending hours on a cool intro/title sequence isn’t worth it when it makes people skip or back out of your video.
- Get people hooked right away. Most people only watch for a few seconds before they decide whether to keep watching or skip to the next video. If you can add a short teaser at the start, do so.
- Try to integrate your Calls to Action into the video organically. Remind people to like and subscribe, but do it in a natural way that won’t take them out of the video.
Best video editing software for vloggers
When it comes to video editing software, things are a little more complex. If you’re already an experienced video editor with a powerful enough computer, you can use a free, professional grade tool like DaVinci Resolve.
However, if you’re new to video editing or need to do your editing on a laptop, you might want to consider something a little more lightweight. Online vlog video editors 404 let you jump right into editing, with an intuitive interface and the cloud-powered technology behind them means that you’ll be able to edit videos smoothly and quickly, even on a laptop. They still offer all the features you might need to edit a vlog, but in a more accessible, convenient package.

Don’t get us wrong, learning how to use a complex professional video editor is definitely useful, but don’t fall into the trap of spending dozens of hours watching tutorials instead of actually putting out content for your channel.
Title, thumbnails and description tips for vloggers
So, you’ve finished editing your vlog and you’re ready to upload it to YouTube, but there is one more thing you have to keep in mind before you can publish it! Your video title, thumbnail and description matter a lot more than you might think.
They’re the first things someone sees before deciding to click on your video and can make a huge difference when it comes to how easy your video is to discover.
Give your vlog a good title
Before you decide on a title for your vlog, do a bit of keyword research. Think about the topic of your video and look it up on YouTube and Google to see what words people use when they talk about it. YouTube’s own autosuggest tab can help you with this, as well as Google’s free AdWords Keyword Planner.
Once you’ve found a keyword, come up with a catchy, intriguing, but descriptive title. Using misleading, ‘clickbait-y’ titles might get you more clips, but people will figure it out and back out of the video early on, which hurts your stats and causes the algorithm to show your videos to less people.
If you’re making a video that’s part of a series, consider moving the episode number, series name or any branding as close to the end of the title while putting the keyword as close to the beginning as possible.
For example, rather than naming your video “Jen’s Vacation Vlog #4 - I found the best Greek street food”, you should name it “Best Greek Street Food - Jen’s Vacation Vlog #4”.
Write solid video descriptions
A lot of people treat video descriptions as an afterthought, but they play a pretty important role in ensuring that your videos are shown to as many people as possible. You should always have at least 200 words in your description, with your main keywords placed as close to the beginning as possible.
Tell people what the video is about and let them know what value they’re gonna get out of watching your vlog, without spoiling any surprises.
You should also consider adding time stamped chapters to your vlogs. This will make your videos more likely to show up in Google searches and also make it easier for people to find what they’re looking for.
Lastly, it never hurts to plug your social media accounts in the description as well. If people like your vlogs, they might want to follow you on Twitter or Instagram as well.
Put effort into your thumbnails
When making videos, don’t leave the thumbnail for the last minute! Since thumbnails are the first things people see when presented with one of your videos, it’s important that you make them stand out from the sea of suggested videos and recommendations.
Obviously, since this is a very subjective subject, there aren’t any golden rules to making thumbnails, but there are still some tips that you should keep in mind:
- Solid colors are best for backgrounds, with red, green, yellow or blue being the best.
- Human faces displaying strong emotions like fear, sadness, happiness or excitement get more clicks, so try to include them as long as it makes sense for you to do so.
- Make sure the text is large enough to be legible even when the image is small. When making thumbnails, it’s easy to forget that the large 720p image you’re working on will only be a couple of inches big later on.
- Find your style and stick with it. Whether it’s the color scheme, the fonts or your image, having a distinctive style will make your videos stand out for fans.
Obviously, when it comes to optimizing your videos for the YouTube algorithm, there is too much to learn to put it all into this guide, but if you want to read more about it, you can check out our other articles on the topic: 22 tips to help you get more views on YouTube and More Tips to Help You Grow Your YouTube Channel.
Promote your vlogs on different platforms
Last but not least, remember that there’s more to vlogging than just uploading videos to YouTube. You should do your best to promote your channel and content on other social media platforms as well, but not in an aggressive, in your face way.
You can cut funny or interesting parts out of your vlogs and post them on TikTok, or as YouTube shorts to help more people learn about your channel. You can also engage with relevant communities on Twitter or Reddit. If people like you, they might check out your profile and find out about your YouTube channel.
If you have an Instagram account, you can use that to engage with your followers and let them know when a new video is coming out.
Don’t forget that YouTube now allows for more than just video uploads as well. Once you have a sizeable community, you can post stories, polls and share images with subscribers, which can help you get feedback from your community and engage with them even further.
How to monetize your vlogs
Now that we've exhausted everything else, it's time we talk about the reason you're here: monetizing your vlogs. Don't worry, there's a number of ways that you can do that and we'll go through each of them:
YouTube Video Monetization & Channel Membership
The most basic form of monetization, this involves allowing YouTube to insert ads throughout your video. You then get paid for each 1000 views your video gets or every time one of your ads get clicked. Sounds simple, right? Well, it is… for the most part. In order to start monetizing your videos, you need to:
- Make sure that you live a country/region where the YouTube Partner Program is available.
- Have no active Community Guidelines strikes on your channel
- Have over 4000 valid public watch hours in the last 12 months
- Your channel needs to have over 1000 subscribers
Another thing to keep in mind is that the amount of money you will get out of this depends a lot based on your content, community and target audience. For example, a travel vlog catering to adults will get paid more for their ads than a channel that caters to middle schoolers, since advertisers know that middle school kids don't have a lot of income to spend on products. Similarly, the language you use and the topics that you discuss in your vlogs can also influence this, since some advertisers might not want their brand to be associated with controversial topics.
What about a Channel Membership?
A Channel Membership allows users to pay a monthly sum of $4.99 in order to support your channel. In return, you can provide them with exclusive access to videos, offer them exclusive content, special badges and emojis that they can use in the chat during your livestreams.
Patreon
Patreon works just like a channel membership, but outside of YouTube. It's a different platform that your subscribers can use to pay you money via a monthly subscription. The difference here is that Patreon allows you to create custom subscription tiers, so your viewers can choose to pay more or less depending on what they can afford.
There's a lot more to be said about the YouTube Partner Program, so if you want to delve deep and learn more about it, check out the official support page.
Sponsorships
If your vlogs are successful enough, you'll eventually attract paid sponsorships. This is where most influencers get the bulk of their money from, but remember: endorsing low quality products will drive away viewers, so don't feature products you don't believe in. You should also make sure to disclose and sponsored videos or product endorsements, since failing to do so can lead to serious legal consequences.
Dan is passionate about all things tech. He’s always curious about how things work and enjoys writing in-depth guides to help people on their content creation journey.