How to Create Video Content Faster With Flixier
Updated on February 18, 2025

If you’re working in marketing, you already know that for a few years now, video content has been quickly taking over the internet.
According to a statistic provided by Oberlo, videos are people’s favorite type of content to see from a brand on social media.
It’s also a known fact that video is great for SEO, with Google often displaying relevant YouTube videos higher than articles in the search results. On top of that, embedding videos in your articles will improve your page ranking as well since videos tend to grab people’s attention and keep them on the page a lot longer.
So, if video content is so great, why are so many people still reluctant to embrace it? Well, that's because making online videos is, at least at first glance, a lot harder than creating written content. It's a lot easier to write a blog post or an article: you can do it from practically anywhere and share it with the world instantly as long as you've got access to the internet. Making a video, however, even if it's just a short clip for social media (like a TikTok or an Instagram Story) is a much more involved process that tends to take a little more time and requires quite a bit of setup, making it seem like it's not a good fit for highly topical content.
Well, with Flixier, one of our goals is to help lower the barrier of entry for video content creation and make it easier for people to edit and publish video. That’s why, in this week’s blog post, we’ve decided to give you five tips that will help you create videos faster and increase your company’s video output:
1. Write a script
If you’re going to have any sort of voice over during your video, it’s extremely important that you first write a script.
At first, it might seem easier to improvise as you go along, but you’ll quickly discover that having a script memorized (or reading off of a script, if you’re not going to appear on camera) makes everything flow along a lot more smoothly and helps you avoid mistakes or long, awkward pauses.
A video where you make mistakes and have to correct yourself constantly is going to diminish people’s trust in your brand, while having to reshoot things over and over just to get it right is going to eat up your time and make the whole process a lot more tedious.
Save yourself the trouble of having to go through either of those and make sure to have a finished script before you start shooting!
2. Plan ahead
Once you have your script ready, don’t jump directly into filming your new clip.
Take a little time to imagine what you want your video to look like and write down all of the footage you’re going to need, from clips of yourself talking, to shots of the product, screen recordings, stock footage or anything else you may need.
Knowing exactly what you have to film makes it easier for you to focus on editing later, since it means you won’t have to stop and set up the camera to take extra shots later down the line.
Getting all of your footage filmed at once also makes it easier if you’re using natural lighting, as there won’t be any major differences from one take to the next. Shooting most of your video with the sun shining through your window only to have to splice in a take that was filmed in cloudy weather the next day is definitely going to look weird to your audience.
3. Keep Your Media Library Organized
This might sound obvious, but let’s not kid ourselves: we all tend to be a little disorganized sometimes, especially when we’re working hard and trying to meet a deadline.
That being said though, it’s important that you make an effort to keep your media library organized. Being able to quickly find the clips you are looking for is going to help you edit your videos a lot faster, not to mention that it will allow you to easily reuse assets later when necessary.
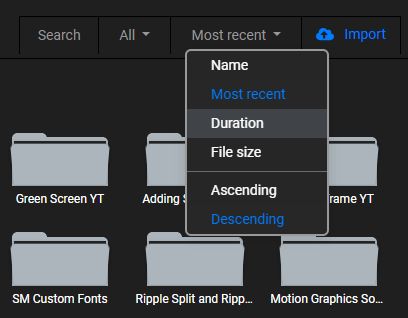
Flixier’s media library makes it easier for you to organize files and find them quickly whenever you need them. You can now:
- Create nested folders
- Move assets from one folder to another
- Rename assets
- Share assets with your team members
- Search through your library or sort assets by Name, Date, Duration or File Size
Make sure to take advantage of all these options in order to quickly find what you need, when you need it.

When I edit videos with Flixier, I make sure to store all of the assets relevant to a project in a folder with the project’s name. I then make different subfolders for video and audio assets. I also give every clip a descriptive name to be able to quickly determine what each video file contains.
It might not sound like much, but trust us, this is going to save you a lot of time, especially when working on longer, more complex projects!
4. Take Advantage of Stock Footage
Depending on the type of project you’re working on, stock footage can be a real lifesaver.
It can serve as extra B-roll when you need to give your viewers something to look at while you talk about a more abstract subject, or it can save you from having to shoot certain things yourself.
If you want to include a few shots of people hiking through nature or strolling on the beach, for example, using stock footage is a lot more cost-efficient and quick than going out, finding actors and getting those shots yourself.

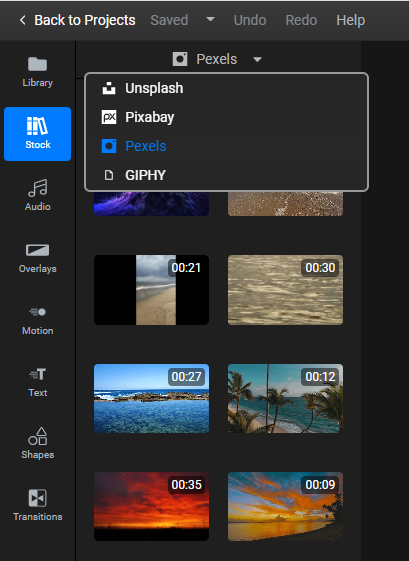
Stock footage is more easily available nowadays than ever before. Websites like Pexels or Pixabay have hundreds of thousands of hiqh-quality stock videos available for free, with very permissive licenses that allow you to include them even in commercial projects!
To make things even easier, Flixier is fully integrated with the biggest stock footage providers on the market right now, including Pexels and Pixabay. All you need to do is oepn the Stock tab on the left side of the screen and you'll be able to switch between the three different tabs to browse through Images, GIFs and Videos. You can even use the search bar at the top to look for specific things. Adding stock footage to your videos is as easy as dragging the desired clip over to the timeline!
On top of that, you can also add music to videos easily! The Audio tab works just like the Stock tab, except it allows you to browse through hundreds of copyright-free music tracks and sound effects which you can use in your videos instead!
5. Use Templates and the Replace Media option
Templates can come in handy when producing a lot of videos that follow along the same format. Rather than adding all of the elements manually each time, you can just duplicate an old project and replace things accordingly.
To give you an example, all of our tutorial videos contain these same assets: an Overlay that’s edited to feature the Flixier colors, the Flixier logo with some transitions to go along with it, the same background music, this end-screen and a recorded outro asking you guys to like, share and subscribe.
Adding all of these things manually when making a new video would take a long time. If you find yourself in the same situation, what you can do instead is go to your projects dashboard, find an older project that’s part of the same series, right click on it and select “duplicate project”. .
This creates a copy of the project that you can now rename and edit accordingly. In our case, since this project already contains the overlay transitions, the background music and the outro, all we have to do is replace the voice over with the new one and add the new footage in the middle.
To swap in the new footage, you can right click on the canvas and select Replace Media. Then, select a new clip from your library and Flixier automatically replaces the old clip for you!
This little trick saves us a lot of time and allows us to put out videos a lot faster. We hope you’ll find it as useful as we do!
If you’re looking for a visual demonstration, please check out this video tutorial we made for our YouTube channel below:
Of course, the templates are only supposed to be a starting point. You can always stray away from the template if your video calls for it. For example, you can use the left side menu to add text to video and customize it to fit the rest of the video seamlessly.
On top of that, using a cloud-powered video editor like Flixier comes with its own advantage. The fact that all of the rendering is done on our servers means that your computer no longer has to struggle for hours trying to export a video! Just click the big Export button within Flixier and we’ll give you a notification within a few minutes to let you know that your export has been completed. You can even close your browser window and do something else meanwhile!
Closing Words
Thank you for reading this to the end! We hope these tips will help you increase your productivity and put out more video content! If you enjoyed this article, please consider trying out our free video editor. While the free version of Flixier has some limitations when it comes to the length of the videos you can create with it and the size of your files, it's still gives you access to all of the core editing features and it makes for a great way to try the tool out for yourself!
Dan is passionate about all things tech. He’s always curious about how things work and enjoys writing in-depth guides to help people on their content creation journey.


