- Home
- Blog
- Social Media
- How Uploading Your Twitch VODs to YouTube Can Make You a More Successful Streamer
How Uploading Your Twitch VODs to YouTube Can Make You a More Successful Streamer
Updated on January 20, 2026
This article is aimed at helping you achieve growth as a Twitch streamer by promoting your content on the YouTube platform. If you continue reading you’re going to learn how to enable Twitch VODs, the benefits they bring and how you can edit and export Twitch VODs to YouTube. We will also be giving you some tips and tricks on how to edit your past stream recordings in order to turn them into proper gaming videos for YouTube.
Summary:
- Twitch VODs are video recordings of your past live streams that you can publish on your Twitch channel.
- They keep your audience engaged and help people discover you even when you are offline.
- Posting edits of your Twitch VODs to YouTube can help grow your following on both platforms.
- Flixier lets you import your VODs straight from Twitch, edit them and publish them on YouTube straight from your browser, without any installs, downloads or long render times.
- Engaging content, Calls to Action, creative titles and thumbnails can make your video stand out and help you grow faster on the YouTube platform.
What is a Twitch VOD?
If you’re reading this you probably already know that Twitch.tv is currently the biggest live streaming website in the world, allowing millions of people to broadcast their gameplay sessions, host live podcasts or simply chat with their audience every month.
What you may not know, however, is that Twitch also offers a fairly extensive Video on Demand system (commonly referred to as VOD).
A Twitch VOD is a recording of your past live stream that you as a streamer can choose to publish on your Twitch channel.
The VOD system also includes Highlights, which are compilations of the best moments from a broadcast. These can be manually created and published on your Twitch channel by either you or your editor (if you have appointed any).
How Twitch VODs can benefit you as a streamer
Due to the platform’s general focus on live broadcasting, a lot of up-and-coming Twitch streamers tend to either dismiss the website’s Video on Demand functionality as something unimportant, or just fail to notice its existence.
This is a huge mistake. Even though they are not the main purpose of the Twitch platform and don’t have the same appeal as live streams, there are a multitude of ways in which VODs can help you grow your channel, whether you’re just starting out or you already have somewhat of an established fan base.
1. VODs show potential followers what your streams are like
Imagine this: someone stumbles onto your Twitch channel while you’re offline. Maybe they ended up there from a post you made on Twitter, or maybe someone mentioned your stream in a reddit or YouTube comment.
As a streamer, you want this person to follow your channel, in the hopes that they will eventually subscribe. But if you aren’t currently streaming, it’s very unlikely that they will do either of these things because your channel’s description isn’t really enough for people to gauge your personality and what your streams are typically like. In other words, your streams could be perfect for them and they wouldn’t even know it.
This is where VODs come in. VODs allow people to check out recordings and highlights from your past streams. This way they can tell whether or not they like what you do. And if they like what they see, they’ll follow you and eventually join your live streams, becoming part of your community.
Getting a solid following isn’t easy when you’re just starting out, so you need to take advantage of every opportunity you can get!
2. VODs keep your followers engaged with your content even when you’re offline
Again, while live streaming may be the main purpose of the Twitch platform, it’s important for you to keep your community engaged even when you’re not online. Sure, live streams are going to be your community’s favorite way of consuming your content, but sometimes life just gets in the way.
There are many reasons why someone might not be able to attend your live stream. Maybe they’re in a different time zone, making it difficult to be there for your streams regularly, or maybe they just had something else to do that day.
VODs are a great way to keep these people engaged and watching your content when they log in, even if you aren’t there. Giving them the option to watch a VOD of the live stream they just missed not only makes it less likely for them to go watch some other streamer that happens to be online, it also increases the chance of them actually showing up the next time you’re live, once they see how much fun your last broadcast was.
This is even more important when your streams are part of a series (such as multiple “episodes” of you playing a long, story-driven video game). Giving people a chance to get up to date with a stream they missed is a great way to make sure that they’ll come back to see the next one instead of giving up on your series altogether.
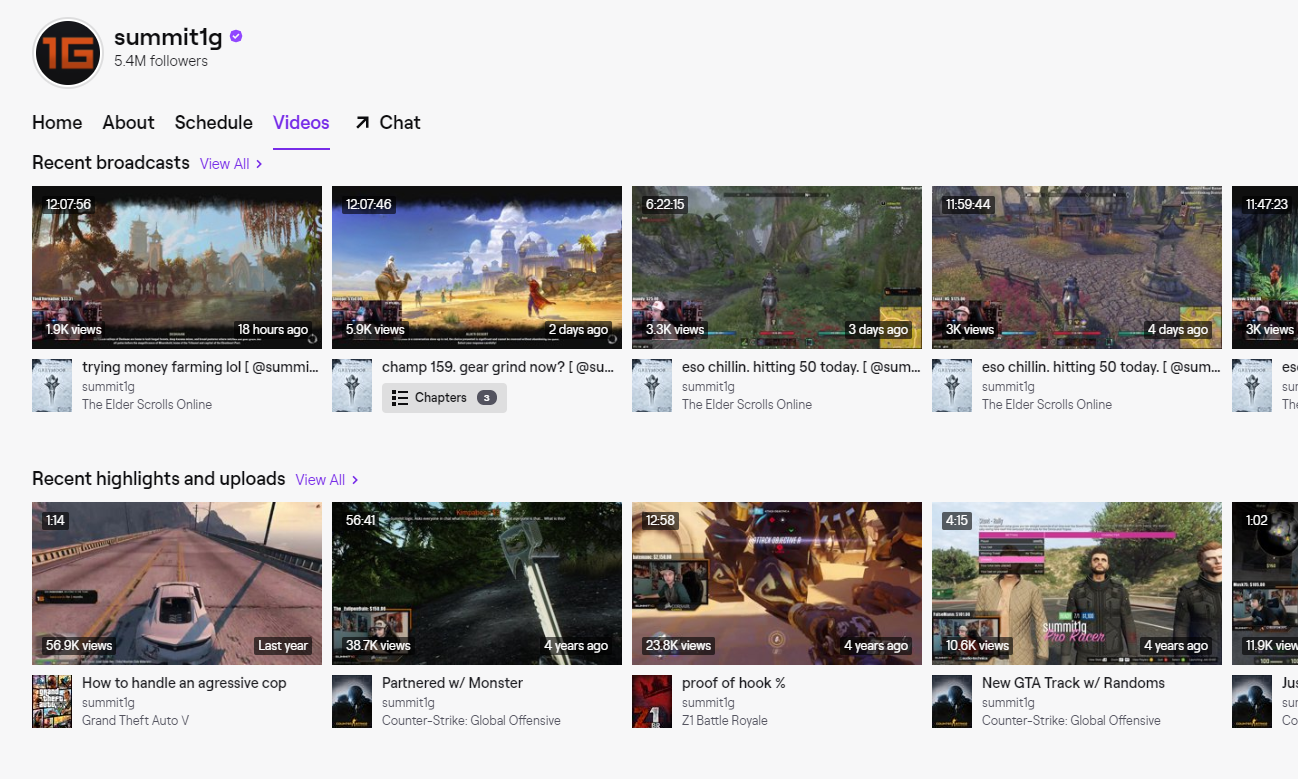
Are you still not convinced? Just take a look at the summit1g, Gaules and Anomaly Twitch channels. These are three of the most popular streamers on the entire Twitch platform right now and all of them have their past broadcasts available to watch for free! Hours upon hours of video content to keep their followers entertained while they themselves are not online.
3.VODs provide content for you to share on social media and even monetize on YouTube
Nowadays, Twitch streaming is more popular than ever but that means the market for Twitch streamers is also a lot more saturated. When there are so many live streams with thousands or hundreds of viewers for all of the popular games, it’s very difficult for people to discover new up-and-coming streamers, unless they’re specifically looking for small streams (which most people are not).
That’s why it’s important for you as a Twitch streamer not to rely solely on Twitch in order to get discovered. If you want to grow faster, you need to have a presence on the most popular social media platforms. You should use these platforms to announce your streams and keep your followers up to date on what’s going on, but also to share content from your streams in order to attract new people to check it out.
VODs provide a great source of content for this purpose. A well edited highlight of one of the crazier moments from your stream might gain traction on Twitter or reddit and make people interested in checking out your Twitch channel. It’s always a good idea to cut out the best parts of a live stream, crop the videos down to make them a bit easier to watch on mobile and then post them to TikTok, YouTube Shorts or even to your Instagram. This type of short content tends to reach a lot more people, potentially exposing tens of thousands of people to your brand. Just make sure that you include a solid call to action and encourage those people to follow you for more shorts as well as watch your streams over on Twitch. And definitely make sure to include a link to your Twitch channel as well as the hours you stream at in your social media bio.
And on top of that, there’s YouTube. More than 15 years after its launch, it still continues to be the platform that people go to when they want to watch long-form video content.
Gaming content is especially well-suited for YouTube, both because of its popularity and because gameplay videos and playthroughs are inherently engaging (meaning that people are more likely to watch them through until the end) and tend to last for at least 15 to 30 minutes.
The YouTube algorithm tends to favor and promote videos that keep people watching for the longest time, which is why gaming videos have exploded on the platform over the last decade.
Knowing that, it’s easy to see why you should start a YouTube channel to promote your Twitch streams, especially since online video editors like Flixier make it easier than ever to edit YouTube videos.
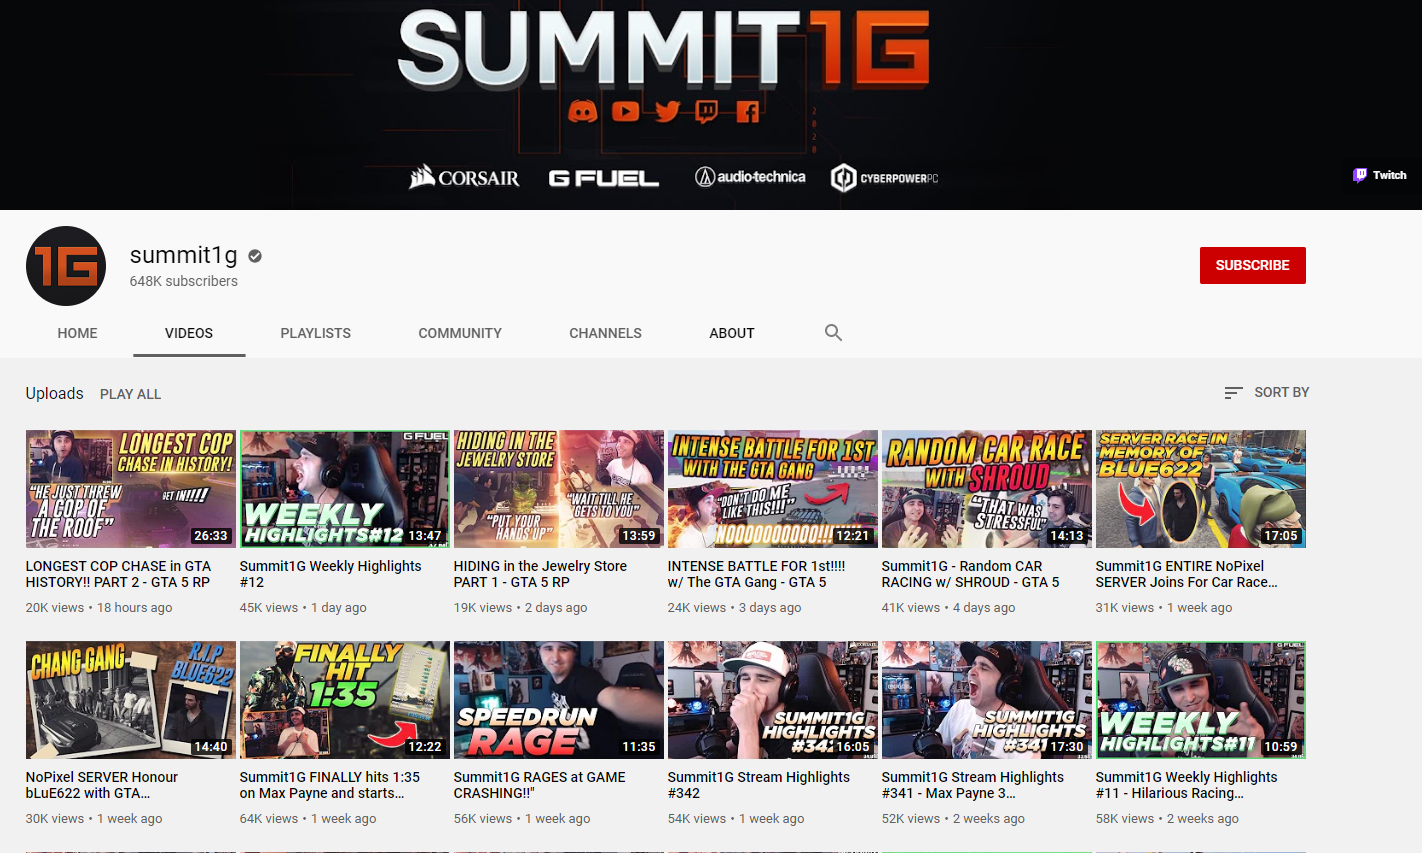
Sure, some of your YouTube following might not transfer over to Twitch, but even so, having more people interested in you, your content and your brand is a great thing, especially if you’re just starting out. And if your YouTube channel grows big enough, you will eventually be able to monetize it which can provide a good source of income to supplement what money you’ll be making from Twitch.
How do you enable Twitch VODs?
Twitch automatically records and saves your VODs when you stream, but for that to happen you first need to enable the option. Here’s how you do just that:
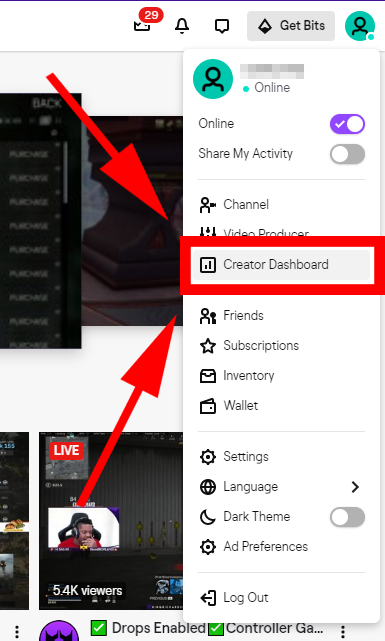
1. First, you need to click on your profile picture in the top right corner of the screen.
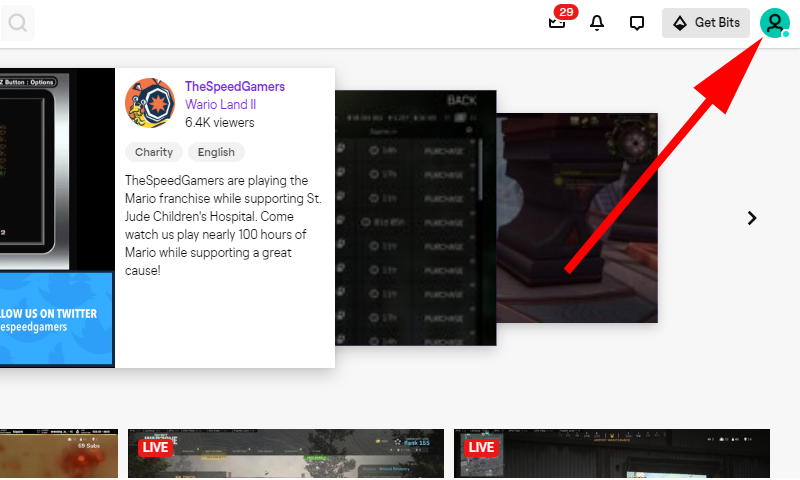
2. From there, click on Creator Dashboard.
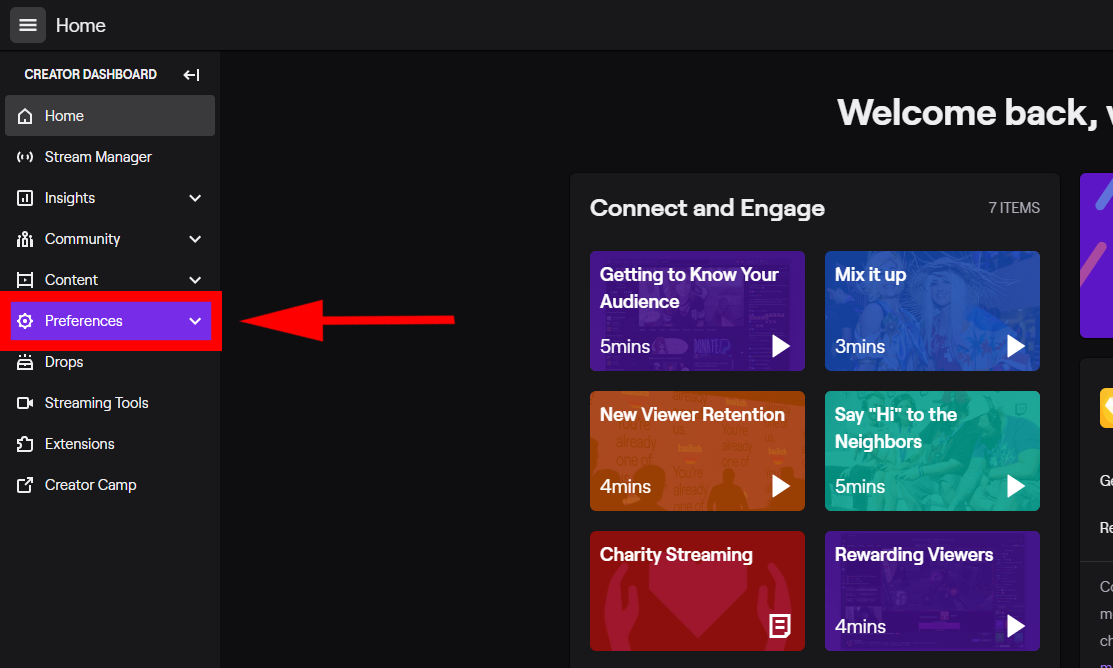
3. Then look on the left side menu and click on Preferences.
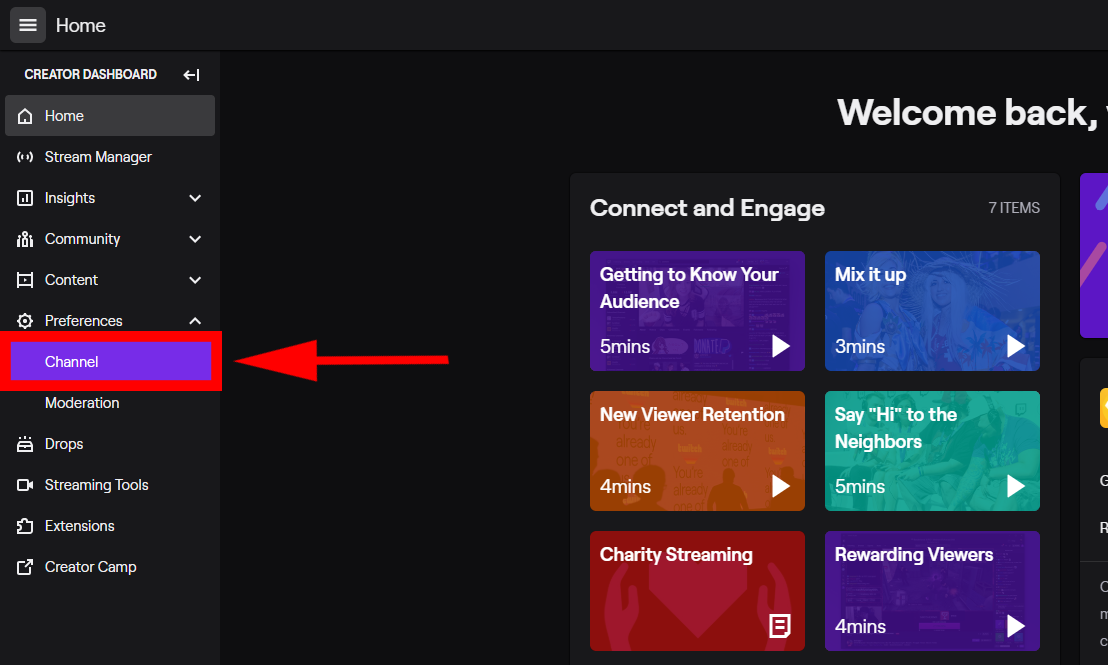
4. Under Preferences, click on Channel.
5. Under Stream Key & Preferences, look for the Store Past Broadcasts toggle and make sure you enable it.
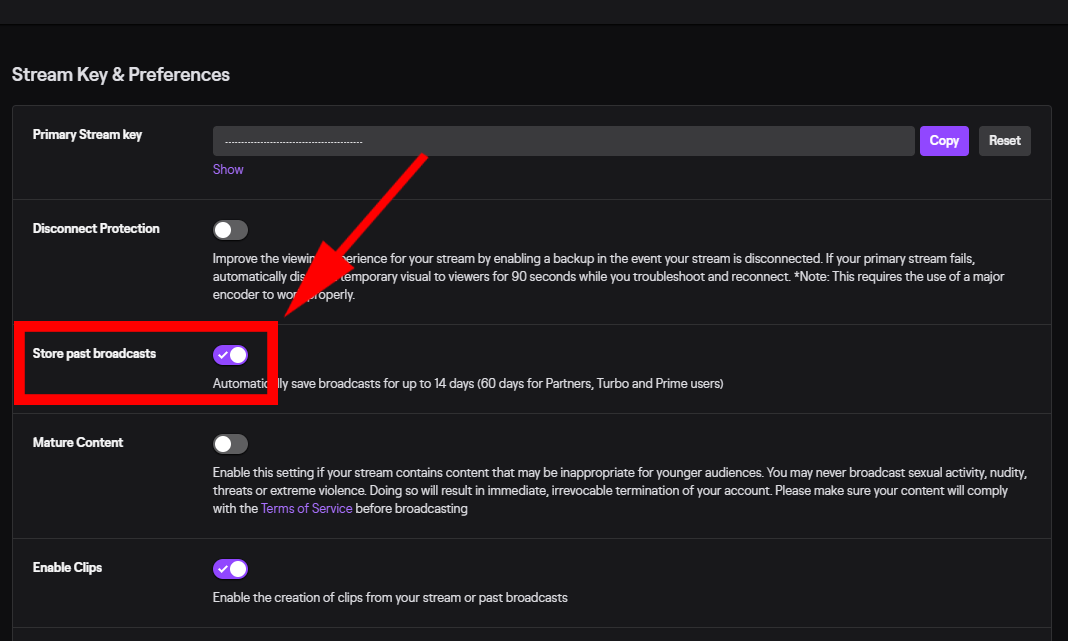
That’s it! From now on, Twitch will save VODs of your past broadcasts and you’ll be able to download, edit or highlight them.
Note that if you’re a regular user, Twitch will only save your broadcasts for 14 days. If you’re a Partner, Turbo or Prime user, this period increases to 60 days.
If you want your broadcasts to be available on the internet for longer, you will need to highlight them (clips and highlights stay up forever) or edit them and re-upload them somewhere else, like your YouTube channel.
How do you export your Twitch VODs to YouTube?
Exporting VODs directly to YouTube
So, you have decided that you want to upload your past Twitch stream to YouTube, but you want to learn how. Luckily for you, there are a multitude of ways to do that, each of them with their own advantages and disadvantages.
The most straight-forward way is to do it straight from the Twitch website:
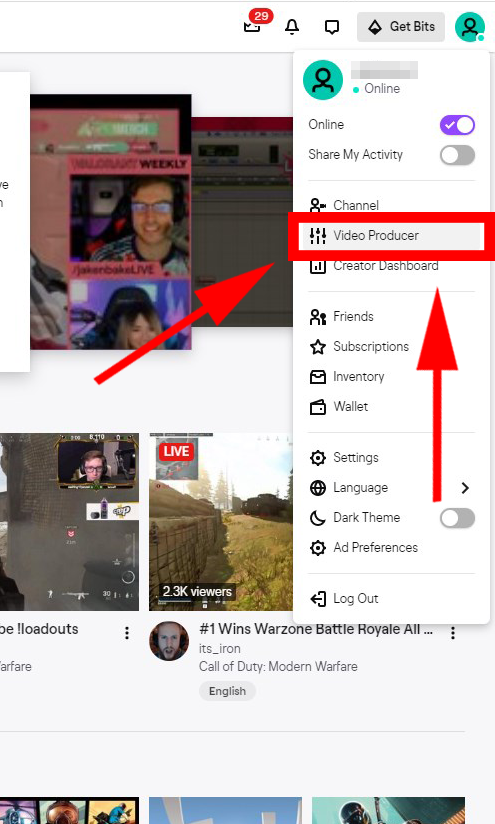
1. First, you need to click on the little arrow next to your name in the top right corner of the screen and click on Video Producer. That will take you to a list of all your Twitch videos, including your past streams.
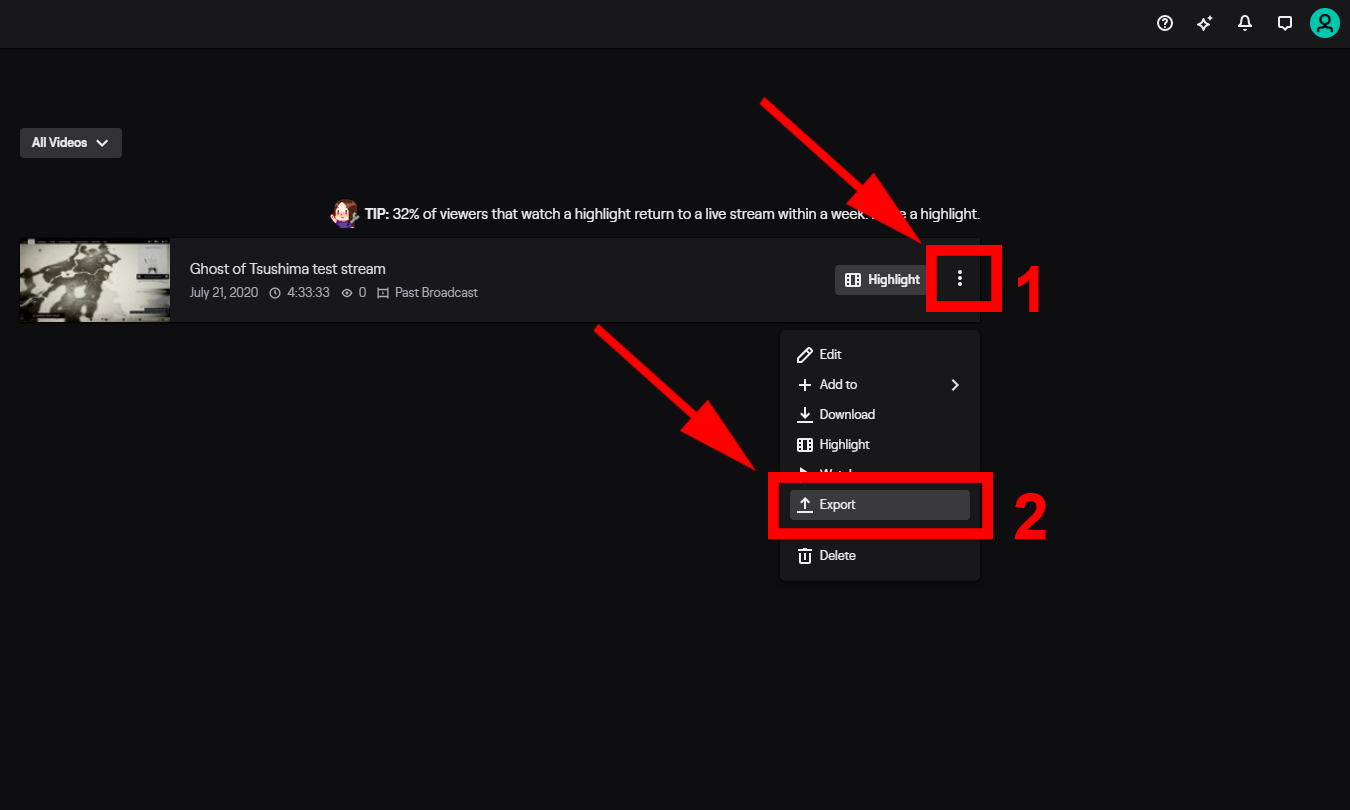
2. From there, simply click the 3 dots on the video you want to export to YouTube and then click on Export.
3. A menu will pop up asking you to fill in the title, description and tags that you want your YouTube video to have. Here you can also choose whether you want your video to be public or private. You’ll also see a checkbox asking if you want Twitch to automatically split the video into 15 minutes segments and upload them as separate videos. After you’ve filled out all the fields and options, all you have to do is click on Start Export .
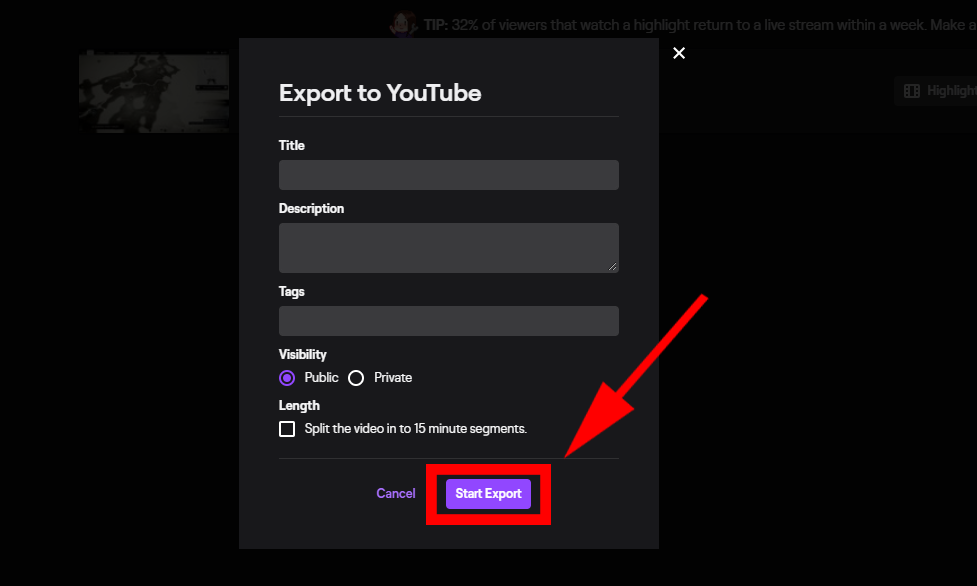
All done! Your video should now appear on your YouTube channel!
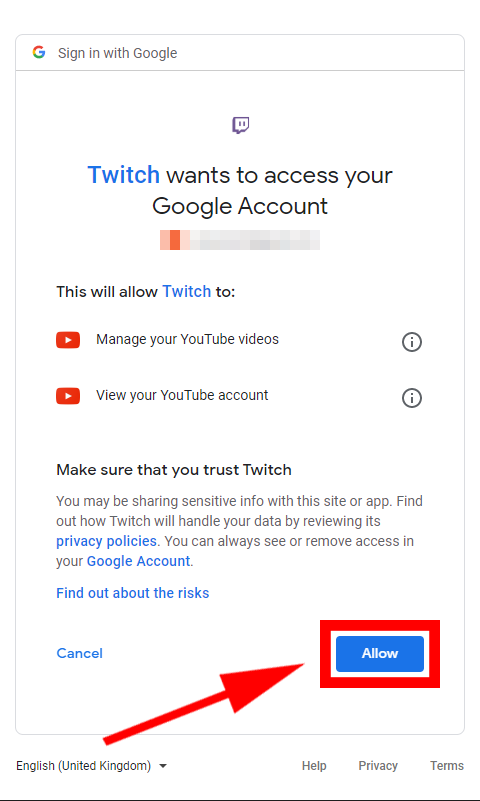
NOTE: If your Twitch and Google Accounts are not linked, Twitch will ask you to do so before allowing you to proceed to step 4. Just follow the on-screen instructions and either select or log into your YouTube account. If you encounter this screen, make sure to click Allow.
Why you SHOULDN'T upload VODs directly to YouTube
This option might be the easiest and most straight-forward way to get your stream recordings on YouTube, but it’s definitely not recommended for growing your YouTube following. That’s because it uploads the entire stream, which usually means multiple hours of footage, including the “boring” parts when nothing particularly interesting happens during your match, your bathroom breaks and all of the time you spend just reading the chat looking for questions or other messages to respond to.
These moments are all natural parts of a live stream and while they’re not as bad for the people watching you live (because they can use that time to interact with you or with each other in the chat), they’re definitely not as fun for a YouTube audience.
Sure, some people will still watch your videos, but your audience is going to consist of only a handful of your Twitch fans who also happen to follow you on YouTube.
In order to actually grow your following on the YouTube platform, you’re going to need to take these stream recordings and turn them into proper YouTube content.
That means editing them like you would a regular YouTube video. This way your YouTube viewers won’t feel like they’re just watching second-hand content recycled from a different platform, but rather something that was made specifically to provide value for them.
Downloading and editing your VODs
So, how can you edit your VODs? Well, the most obvious way would be to use traditional editing software. That means learning how to use a video editing program, installing it to your computer and then downloading the VOD’s you want to edit.
To download a VOD, you need to follow the same steps you followed in the "Exporting to YouTube" part, only instead of clicking the Export button, you click on Download.
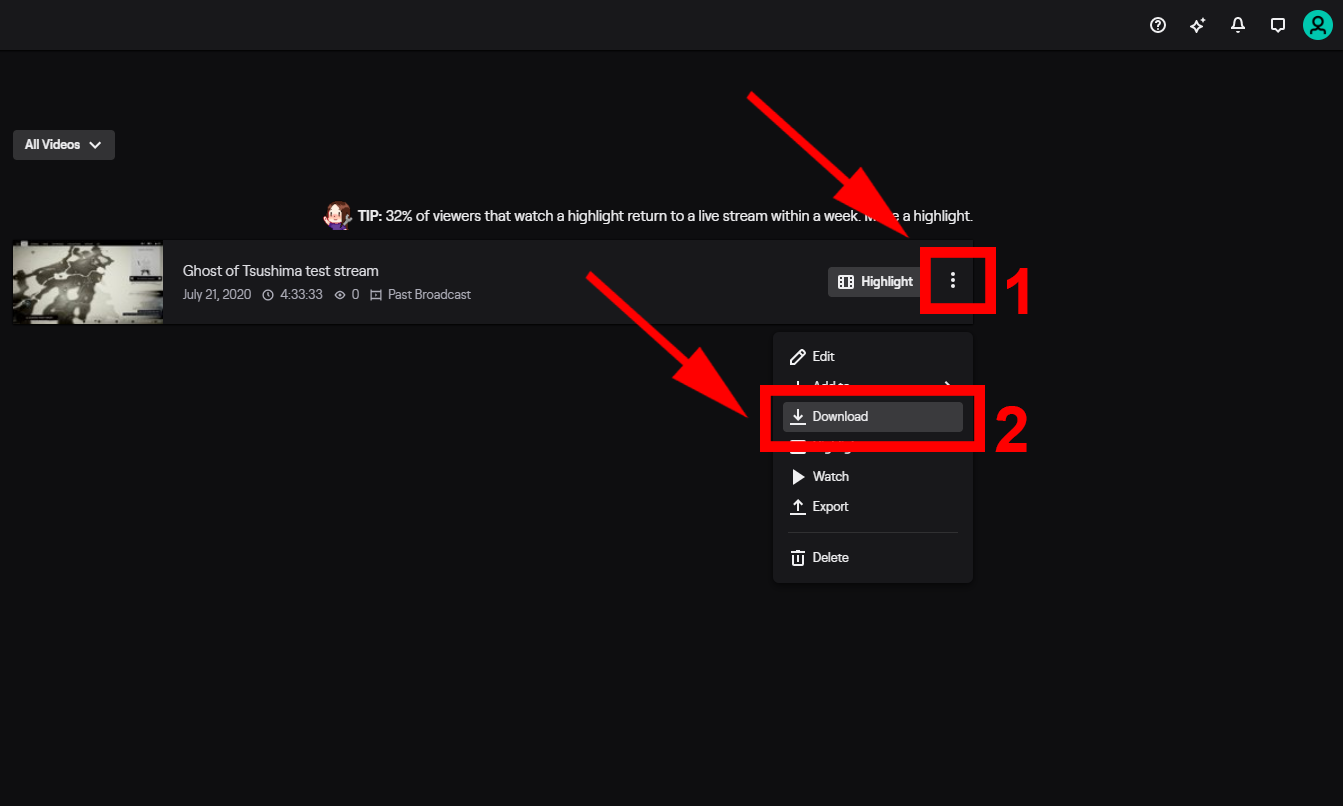
Then, after your VOD is downloaded, you open it up in your favorite video editing program and work your magic. You then export the video and upload it to YouTube just like you would any other clip.
Why you SHOULDN'T use traditional editing software for editing Twitch VODs
This method fixes the problems that exporting to YouTube straight from Twitch poses, but can introduce some new ones:
- If you stream for extended periods of time, your footage can take a lot of time to download and will occupy a whole bunch of space on your hard drive. If your internet connection isn’t super fast, it’s quickly going to become a pain to try and fit “waiting for my VOD to download” into your already busy schedule.

- Video Editing Software can be extremely laggy, especially on laptops and older computers. Of course, the PC gamers out there probably won’t have this issue since high-end gaming/streaming computers tend to match the system requirements for a lot of video editing software. If you’re a console gamer and try doing editing on the same old laptop you mainly use for browsing the internet and doing schoolwork, however, you might discover that the process is a lot more taxing than it initially seems and a choppy, laggy experience is just as terrible and frustrating when trying to edit videos as it is when trying to play games.
- Render times can be very long. This obviously depends on the hardware you’re using and the length and complexity of the videos you’re trying to make, but rendering times are generally a lot longer than people expect, especially if you’re using older hardware, not to mention that the process is so taxing that you won’t be able to do much else with your computer while your video is rendering.
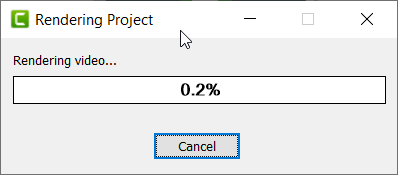
- You have to wait for your videos to upload to YouTube. Again, this is just another time waster that you have to plan your schedule around. If you have a Gigabit connection then this is likely not going to be a problem, but for most of us it’s a thing to consider when planning out our day.

How using Flixier to edit your Twitch VODs fixes all of these problems
Let’s start with a quick explanation of what Flixier is: Flixier is a lightning fast, easy-to-use free online video editor that allows you that functions entirely in your web browser, using cloud-powered technology to render any video you throw at it in 3 minutes or less.
You might be wondering what the point of it is and why you should use it. Well, it’s all pretty simple: we all know how frustrating it can be to wait around for downloading, uploading and rendering to be over, so we designed Flixier with the main goal of saving you as much time as possible so you can focus on what you do best: creating content.
- Flixier has full Twitch integration, meaning that you can link your Flixier and Twitch accounts together and import your VODs straight from the Twitch servers. That means your stream footage will be ready for editing in seconds, regardless of your internet connection and without having to actually download it to your computer.
- Once you’ve finished making your edits, your video will render in a few minutes, and because Flixier uses cloud servers to do the hard work, you can simply close your browser window and do something else while you wait for it to be done. You’ll be notified via e-mail when the process is over.
- Flixier also has YouTube integration, meaning that you can set it to publish your video straight to YouTube after rendering is complete, essentially giving you the freedom to go do something else immediately after you’ve finished doing the actual editing.
- Our focus on speed also extends to the user experience: because Flixier has been engineered from the ground up to run in a browser, it means that Flixier will run smoothly and without lag on any machine, whether it’s a high-end gaming computer or a 6 years old laptop.
If you want to learn how to connect your Twitch and Flixier accounts together and start working on your videos, check out the following video:
How to make your Twitch stream recordings enjoyable for a YouTube audience
Unfortunately, enabling Twitch VODs and choosing a video editing software program isn’t enough to turn your stream recording into quality content that people on YouTube will want to watch.
There’s a lot of work and thought to be put into turning your hours-long streams into successful YouTube videos. While this article isn’t going to go in-depth about video editing techniques (there’s plenty of tutorials available online, including here on our blog and Help section), we are going to give you a couple of tips and pointers on how to create content that will help your channel grow
1. Make sure your video is longer than 10 minutes
Over the last few years, it’s become apparent that the YouTube algorithm tends to favor lengthier videos, specifically those longer than 10 minutes. That means that if your video is at least 10 minutes or longer, it’s more likely that YouTube will recommend it to people and that it will rank higher in search results for that particular topic. This is very important, considering that the purpose of your YouTube channel is to grow your audience in order to bring new people to your Twitch streams.
2. Engaging content and Audience Retention are key!
Audience Retention refers to how far into a video your viewers get before clicking on another video or changing the page. If you have a 20 minutes long video and the average viewer only watches the first 10 minutes of it before moving on to something else, that’s a 50% Audience Retention rate for that video.
The YouTube algorithm takes Audience Retention very seriously when deciding whether or not to recommend your video to other people, so it’s very important that you try to keep it as high as possible.
The only way to make sure the Audience Retention of your videos stays high is to provide quality content that keeps the viewer engaged. In our particular case, that means editing your stream footage tightly to eliminate long silences or segments when nothing particularly interesting is happening on screen.
If you were playing a competitive game on stream, you can try to break down the footage and explain your thought process during those moments. People love to improve themselves by watching more experienced players.
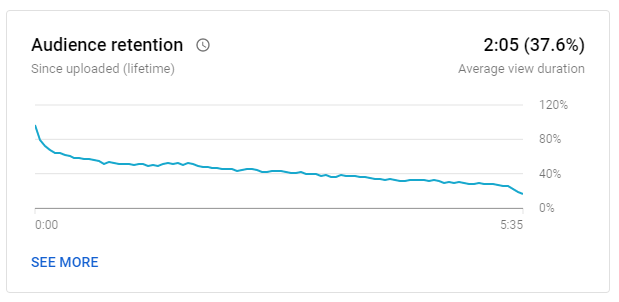
The YouTube algorithm takes Audience Retention very seriously when deciding whether or not to recommend your video to other people, so it’s very important that you try to keep Audience Retention as high as possible.
The only way to make sure the Audience Retention of your videos stays high is to provide quality content that keeps the viewer engaged. In our particular case, that means editing your stream footage tightly to eliminate long silences or segments when nothing particularly interesting is happening on screen.
If you were playing a competitive game on stream, you can try to break down the footage and explain your thought process during those moments. People love to improve themselves by watching more experienced players.
3. Be creative with your titles!
Given that your content will essentially be highlights of your past streams, it can be tempting to use a title scheme like “Stream Highlights from day/month/year”. That might make it easy for your already existing Twitch fan base to find your videos, but it won’t help you get discovered and grow your audience on YouTube.
In order to achieve growth, you will have to get a little more creative and find some titles that are both eye-catching and make it seem like the content was made especially for the platform.
Let’s say you streamed a couple hours of Call of Duty and played using the new rifle they added to the game. Once you edit that footage down into a video, a title like “Is this new Call of Duty rifle OP?” is guaranteed to get more views than something like “Call of Duty Stream Highlights #14” or even “Call of Duty New Rifle Gameplay”.
You need to be careful, however. No matter how good your ideas are, the titles should always reflect the content of your video as accurately as possible. If they don’t, people will figure that out quickly and leave, causing your Audience Retention to go down.
4. Make sure your thumbnails stand out!
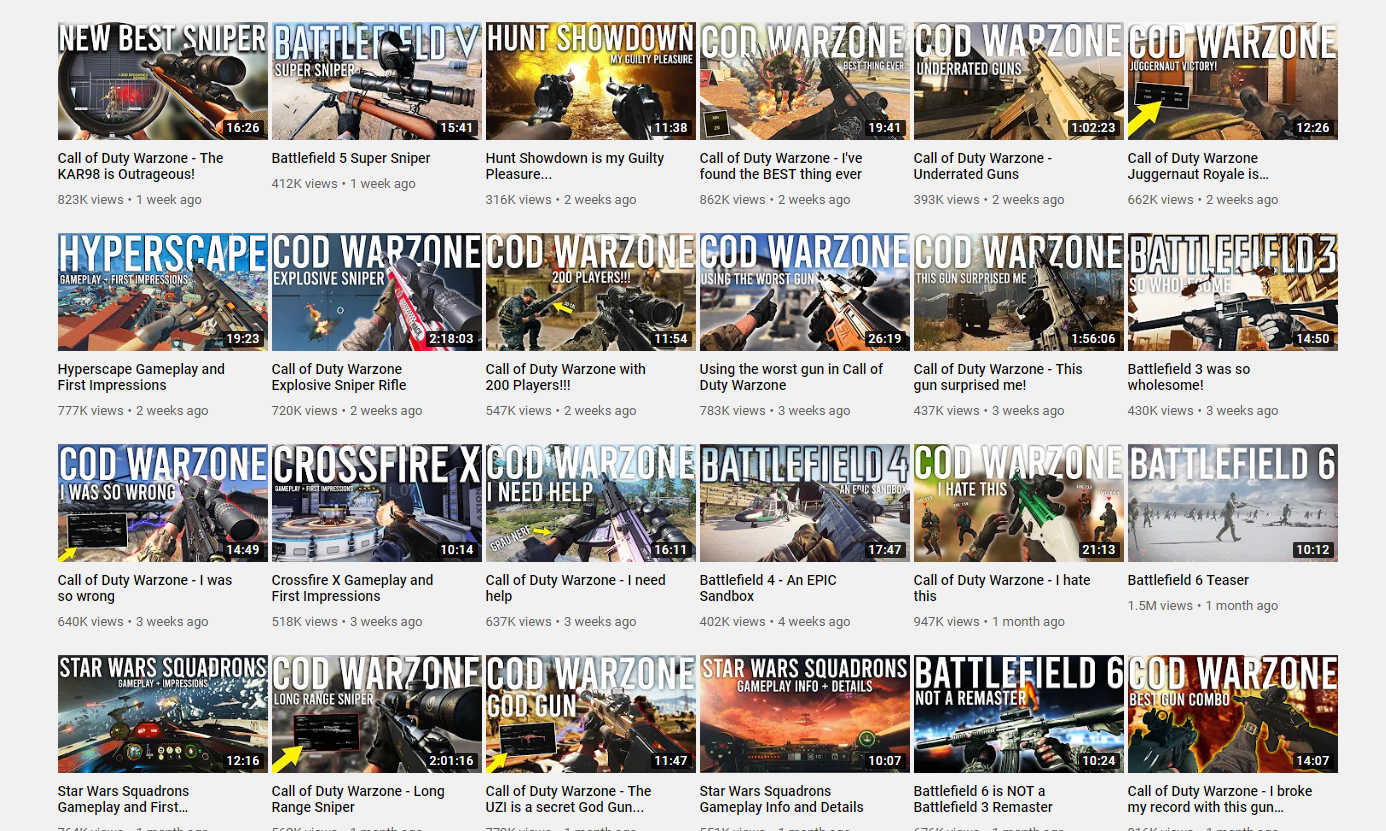
It’s easy to assume that a simple still from your video is a good enough thumbnail, but a colorful, representative and on-brand thumbnail is much more likely to draw the attention of potential viewers.
It’s generally believed that solid colors such as red, yellow, green and blue are among the best to use as a background.
Faces also work great for drawing people’s attention, so if you used a face cam during your stream, don’t hesitate to put a reaction shot of yourself in the thumbnail.
Including a simple logo can also work in your favor (especially if you combine it with a brand-specific color scheme that lets people instantly know the video is yours), but avoid using text in the thumbnail since it will most likely be difficult for people to read it.
Lastly, your thumbnail should be clear and representative of the title. Let’s go back to the Call of Duty example from earlier. If the title is about the new rifle that was added to the game, the thumbnail could include a picture of it to make it clear for potential viewers what the video is going to be about.
5. Don’t forget to add a Call To Action!
A Call To Action tells your viewer what to do after they finish watching your video. In our case, it would most likely involve reminding your viewers to like the video and subscribe to your channel, as well as follow you on Twitch and any other form of social media you might be active on.
It can seem a little cliche at first, but Calls To Action are a tried and tested marketing tactic and using them in your videos is bound to help both your Twitch and YouTube channels grow faster.
If you want to make your Calls to Action more engaging and interesting from a visual standpoint, you should consider using animated graphics or overlays that draw the user’s eye towards them. You don’t even have to be an animator to do it! Flixier, for example, offers dozens of these ready-made, highly customizable animations for free.
To learn more about creating high-quality YouTube content and growing your channel, check out our list of 25 Tips and Tricks That Will Help You Get More Views on YouTube.
Closing Words
Thank you for sticking with this guide all the way to the end! We know this was a long read, but we hope that the information provided in this article will help you grow and succeed in your streaming career.
As a final piece of advice, remember that no matter what strategies you choose to employ in order to grow your Twitch channel, being constant and persevering in the face of initially discouraging viewer counts are key to becoming a successful Twitch streamer!
For more guides on video editing, YouTube and Twitch streaming, please consider checking out the rest of our blog and our YouTube channel! If you want to start your video creation journey, register for an account and start editing right now!
Dan is passionate about all things tech. He’s always curious about how things work and enjoys writing in-depth guides to help people on their content creation journey.

Seven Tips That Will Make Your Microphone Sound Better When Recording
If you’re looking to improve the quality of your voice recordings, you don’t need to worry anymore! We’re here to give you some tips that will help you get better sound for your videos. These tips will work regardless of whether you’re using Flixier to record your voice or other programs like Audacity or Adobe Audition. For the most part, getting a high quality recording relies mostly on preparation, meaning most of the work gets done before you even press the Record button.
How to Stream Games on Twitch From an Android Phone
If your phone is your main gaming platform, it’s only natural that you might want to stream your gameplay on Twitch as well. After all, PCs and consoles have been doing it for years, so why not phones? This article is going to show you how to easily start streaming your mobile gaming sessions on Twitch. All you need is your phone and an internet connection.
How to Stream on Twitch Using Your PS4 With NO Capture Card
This article will show you how to start streaming your game sessions on Twitch straight from your PS4 in only a few minutes, without the use of a capture card, a computer or Remote Play.


